|
|
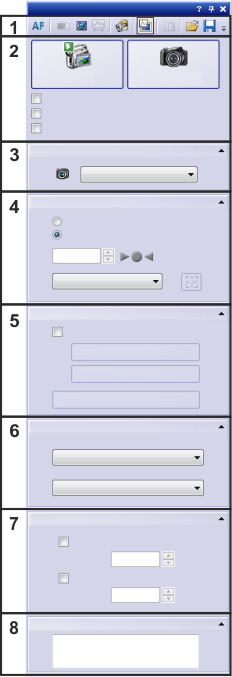
Use the Camera Control tool window to acquire images and movies. In the Acquisition layout, this tool window is available by default. Should this tool window not be visible, use the View > Tool Windows > Camera Control command to show it. Note: Some of the settings in the Camera Control tool window are camera specific (the available resolutions for example). For this reason, your camera's functionality can differ from what is described here. Structure of the tool windowThe tool window is made up of several parts. Click on one of the areas in the tool window shown below, to jump to the corresponding help topic. (2) Acquiring images Functions groups in the camera control(4) Adjusting the exposure time (7) Averaging images
Showing/hiding function groupsThe tool window contains a number of function groups, which you can use to make various settings for image acquisition. You can shrink the function groups so that only their headings are shown. This means that you can hide functions that you don't often use. Click the small arrow next to the group name See also (1) The tool window's toolbarIn the Camera Control tool window, a number of buttons are at your disposal on the toolbar.
The following table lists the buttons which are available by default on the toolbar.
(2) Acquiring imagesAcquiring images
Click the Live button to switch your camera to the live mode. The live-image will then be displayed in the image window. The button will change its appearance. This enables you to immediately recognize that you are in the live mode.
When you are in the live mode, click the Live button once more to end this mode without acquiring an image. You can change this behavior. To do so, use the Acquisition Settings > Acquisition > General dialog box. A description of this dialog box can be found here. Navigating in the live modeWhen you have carried out the Image Shift and Stage calibration processes for the current magnification, you can navigate in live mode by double clicking. Make sure that the mouse is in pan mode. You can find the Pan Tool button on the Toolbox toolbar. In the pan mode your mouse pointer will take on the shape of a hand. Move your mouse pointer over the position on the sample you want. Double click on the position on the sample. The position on the sample moves to the center of the image window. A four-pronged arrow next to the mouse pointer indicates whether it is possible to navigate using image shift or by movement of the stage. Based on the specified magnification and the calibrations that have been carried out, the software automatically selects whether the position on the sample is moved to by image shift or by movement of the stage. •A white four-pronged arrow indicates that the stage is being moved to navigate to the position on the sample. Navigating using image shift is not possible. •A green four-pronged arrow indicates that navigation is being achieved by image shift.
You will find more information on the calibration processes here.
Click the Snapshot button to acquire a snapshot. The live mode will then, as a rule, be exited. The image you have acquired will be shown in the document group. Image acquisition - several waysYou have several ways of switching to the live mode to acquire snapshots: •Use the Camera Control tool window. •Use the buttons on the Camera Control toolbar. •Use either the Acquire > Live or the Acquire > Snapshot menu commands. •Use the [F7] key to switch to the live mode. Use the [F8] key to acquire an image. Recording moviesSelect the Movie recording check box if you want to acquire a movie. The buttons in the Camera Control tool window will then change both their appearance and functions.
There are several ways of recording movies: •Use the Camera Control tool window. •Select the Acquire > Movie menu command to start the movie recording. The Movie recording check box in the Camera Control tool window will now be automatically selected. •Use the [F9] key to start the movie recording. The Movie recording check box in the Camera Control tool window will now be automatically selected.
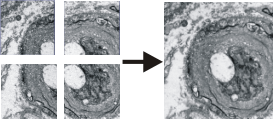
You can find more information on movie acquisition here. Snapshot drift correctionUse the Snapshot drift correction function to reduce blurring on image segments that may result from the sample drifting. A sample with high contrast is required to carry out the drift correction. Note that the acquisition time of images is longer when drift correction is active. Note: The Snapshot drift correction function is only available for the acquisition of snapshots. The Snapshot drift correction check box can only be selected when the Movie recording check box is not selected. When you select the Snapshot drift correction check box and then click the Snapshot button, the camera acquires up to 16 images with a short, automatically determined exposure time. The software integrates these images into a new image. The resulting image only contains the image segments that are contained in all of the images. MIAUse the MIA (Multiple Image Alignment) function to have several individual images combined, as with a puzzle, into a stitched image. You will then get a high-resolution stitched image. Without MIA, acquiring a single image with this resolution would not be possible. Note: The MIA check box can only be selected when the Movie recording check box is not selected.
The illustration shows left, four separate images. On the right, you see the stitched image made up from the four individual images. You can find additional information on the MIA acquisition process here. (3) Selecting the cameraA transmission electron microscope has two different places where cameras can be mounted. A camera can be mounted below the microscope column or on the side of the microscope column. If you use two EMSIS cameras with your microscope, you can control both cameras with your software. You have to register all cameras you want to use with your software, by using the Acquire > Devices > Device List... command. In the Camera Control tool window, you can find a picklist immediately below the Live and Snapshot buttons. Before you make an image acquisition, you will have to specify there, with which camera the acquisition is to be made. Select the camera you want from the list. Note: All settings in the Camera Control tool window always relate to the currently selected camera. When you select a camera, you also automatically load the settings that were last selected for this camera. (4) Adjusting the exposure timeUse the Exposure group to set the exposure time. The functions in the exposure time control depend on whether you choose to use the automatic exposure time option or to set the exposure time manually. The automatic exposure time is preset. Automatic exposure timeIn the automatic exposure time mode your system will continuously calculate the optimum exposure time for the snapshot. The snapshot acquisition always uses the last exposure time that was calculated in the automatic exposure time mode.
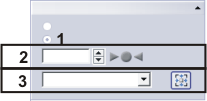
Select the Automatic (1) option to have the exposure time calculated automatically. The automatically determined exposure time is then displayed (2). Specify the image segment which will be used to calculate the exposure time (3). The automatic exposure time for the snapshot will always be calculated on the basis of the histogram, that is, the intensity distribution in the live-image. If the live-image has a different resolution from the snapshot, this is automatically taken into account when computing the optimal exposure time. Use the Resolution group to set the camera resolution. From the Region (3) list, select the image segment that is to be used for the calculation of the histogram and thus of the automatic exposure time. Select the Full Image option so that the histogram of the entire image goes into the exposure time. This method is recommended if the structures to be observed are equally dispersed throughout the entire image. Select the Spot option to have the histogram of only a rectangular image segment calculated. The size of the image segment is fixed, and depends on the camera you use. As soon as you switch to the live-image you will see a white dashed rectangle that identifies the relevant segment of the image. You can move the rectangle to any position in the image by dragging it there with your left mouse button pressed, and in this way you will then influence the exposure time. You can use this method if relevant details are only visible in a part of the image. The image acquisition can thus be optimized for precisely this segment of the image. You can also change the image segment you've selected, however you want to, at any time. Click the Center Spot on Image Manual exposure timeSelect the Manual option. Now you can enter any exposure time you want for the next snapshot. Use this mode if you want to compare the image intensity in different acquisitions with each other, for example. If the live-image has a different resolution from the snapshot, this is taken into account for the live-image's exposure time.
Select the Manual (1) option to enter the exposure time yourself. Enter the exposure time you want in the field (2) or use the slide control (3) to set it. Please take note of the display (4). There are several different ways of manually setting the exposure time. •Use the slide control (3). •Click the [-] and [+] buttons to alter the exposure time in small steps. •Enter an exposure time in the edit field (2), then press the [Enter] key. Or change the exposure time by using the arrow buttons next to the edit field. The visual exposure indicator has the following statuses:
•When the left arrow is green (1), the image is too dark. Increase the exposure time. •When the right arrow is green (2), the image is too bright. Reduce the exposure time. •When the point in the center is green (3), the image is optimally exposed. •When the right arrow is red (4) the image is overexposed, even though the camera is using the shortest possible exposure time. Reduce the beam intensity on the TEM. •When the left arrow is red (5) the image is underexposed, even though the camera is using the longest possible exposure time. Increase the beam intensity on the TEM. In this case, you can also increase the maximum possible exposure time. To do so, use the Acquisition Settings > Camera > Exposure dialog box. Additional exposure time settingsUse the Acquisition Settings dialog box to make additional settings that effect your camera's exposure. For example, you can set a maximum exposure time. A description of this dialog box can be found here. Exposure time in the image propertiesWhen each image acquisition is made, the exposure time will be adopted in the Properties tool window. You will find this information in the Camera group. This information will be retained if the image is saved in the TIF or VSI file format. (5) Acquiring HDR imagesCertain image modes (diffraction for example) can produce such strong differences in brightness that it is not possible to find an exposure time which is suitable for all parts of the sample. For such samples, an HDR image acquisition is recommended. HDR stands for High Dynamic Range. Dynamic range relates to the capacity of cameras, or image processing software, to display both bright and dark image segments.
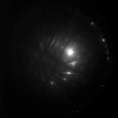
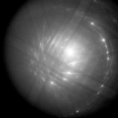
The first illustration shows a diffraction image of Silicon that was acquired without HDR. The second illustration shows the same diffraction image of Silicon, this time acquired with HDR. You can find detailed step-by-step instructions on how to acquire HDR images here.
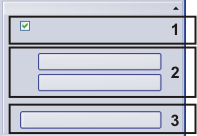
(1) Activate HDRSelect the Activate HDR check box to activate this function. The Snap Note: Selecting the Activate HDR check box simultaneously changes the acquisition mode used by the Acquire > Snapshot menu command and the Snapshot button located on the Camera Control toolbar. In contrast to the command name shown in the Camera Control tool window, the menu command is still named Snapshot, even when an HDR image is acquired. (2) Determine exposure rangeBefore acquiring an HDR image, the necessary exposure range needs to be determined for the current sample. The exposure range is made up of a minimum and maximum exposure time as well as several exposure times between them. In the Determine exposure range group, click the Automatically button to acquire the HDR image with an automatically defined exposure range. In the Determine exposure range group, click the Manually... button to acquire the HDR image with a manually defined exposure range. After determining the exposure range, the Total time field shows how long the HDR image acquisition will take. (3) Preview HDRClick the Preview HDR button to display a preview of the HDR image in the document group. (6) Setting the resolutionUse the Resolution group to set the camera resolution. Note: Which resolutions are possible, depends on the camera being used.
You can set different resolutions for the live-image and the acquired image. Select the resolution you want from the Live/Movie list (1) or the Snap list (2). Setting the camera resolutionSelect the value you want for the resolution in the Live/Movie or Snapshot list. A resolution of 2048 x 2048 means, for example, that the image you acquire will be made up of 2048x2048=4194304 pixels. Different resolution for live-image and snapshotYou can set a different (lower) resolution for the live-image than that which you use for the snapshot. That makes sense, for example, when you wish to have a live-image that reacts quickly, but want to use the maximum resolution for the acquisition of the snapshot. What is binning?Binning will reduce your camera's resolution. With binning, the camera combines pixels to form larger pixels. Then less data will be transferred from the camera into the software, and the live-image will be updated more quickly. At the same time, the camera's sensitivity will increase, and the exposure time will become shorter. (7) Averaging imagesIt possible to average several images during the image acquisition. Each image is acquired using the current camera settings. The images are added and, for each pixel, the mean value is calculated. Use this possibility to reduce noise in the image. You can set the accumulation for live-image and snapshot separately. To do so, select one or both of the check boxes Snap and Live. Enter the number of image that are to be used for the accumulation into the Frames fields. Note: When you've activated averaging for the live-image and the image then changes substantially, the images that have already been averaged are discarded. The averaging is then restarted for the current position on the sample. (8) Entering an image commentIn the Camera Control tool window, you can enter text in the Note field. This text will be saved along with the image as a comment. Note: The image comment is not saved along with the other camera settings. Viewing a commentAfter the image has been acquired, you can view the text in the Properties tool window's Note field. To do so, you can load the image and use the View > Tool Windows > Properties command to make the tool window appear. Displaying the comment in the image windowYou can have the image comment displayed in the image window, together with the info stamp. How you specify the contents of the info stamp, can be found here. Deleting or editing comments for individual images1.In the Properties tool window, expand the Document group. 2.You will see that the comment you entered in the Camera Control tool window has been adopted in the Note field. 2.Click in the Note field. 3.When the Note field is active, a small button with three dots will appear. 3.Click this button. 4.Delete or change the comment in the Note dialog box. 00236 04032015 |

 to reduce the group's size. Click this arrow
  to expand the group.


 button to have the image segment that is relevant for the exposure time returned to the center of the image.

 button.