With your software you can acquire movies and time stacks.
Recording a movie
You can use your software to record a movie. When you do this, your camera will acquire as many images as it can within an arbitrary period of time. The movie will be saved as a file in the AVI format. You can use your software to play it back.
1.Switch to the Acquisition layout. To do this, use, e.g., the View > Layout > Acquisition command.
Selecting the magnification
2.Select the magnification that you want to use for recording the movie in the Camera Control tool window.
Selecting the storage location
3.In the toolbar of the Camera Control tool window, click the Acquisition Settings  button.
4.The Acquisition Settings dialog box opens.
4.Select the Saving > Movie entry in the tree structure.
5.You have to decide how a movie is to be saved after the acquisition. Select the Filesystem entry in the Automatic save > Destination list to automatically save the movies you have acquired.
6.The Path field located in the Directory group shows the directory that will currently be used when your movies are automatically saved.
6.Click the [...] button next to the Path field to alter the directory.
Selecting the compression method
•The AVI file format is preset in the File type list. This is a fixed setting that cannot be changed.
7.Click the Options... button when you want to compress the AVI file in order to reduce the movie's file size.
8.From the Compression list, select the M-JPEG entry and confirm with OK.
9.Close the Acquisition Settings dialog box with OK.
Setting the image quality
10.Switch to the live mode, and select the optimal settings for movie recording, in the Camera Control tool window. Pay special attention to setting the correct exposure time.
11.This exposure time will not be changed during the movie recording. Even if you've set the exposure time to automatic, the exposure time will not be adjusted during the movie recording.
11.Find the segment of the sample that interests you and focus on it.
Switching to the "Movie recording" mode
12.Select the Movie recording check box (1). The check box can be found below the Live button in the Camera Control tool window.
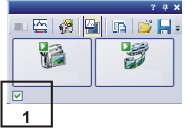
•The Snap button will be replaced by the Movie button.
Starting movie recording

13.Click the Movie button to start the movie recording.
14.The live-image will be shown and the recording of the movie will start immediately.
15.This icon  on the Movie button will indicate that a movie is being recorded at the moment.
Stopping movie recording

14.Click the Movie button again to end the movie recording.
15.The first image of the movie will be displayed.
16.The navigation bar for time stacks will be shown in the document group. Use this navigation bar to play the movie.
17.The software will remain in the Movie recording mode until you clear the Movie recording check box once more.
00304 04042013