MIA stands for Multiple Image Alignment. Use the MIA function to acquire adjoining areas of the sample by shifting the image or stage. All of the images that are acquired are combined, just like a puzzle, into a stitched image. The intensities of the individual images are adjusted automatically. The stitched image displays a large area of the sample in a higher resolution than would be possible with a simple snapshot.
Prerequisites:
•Valid shading correction images are available and have been activated.
•The magnification has been calibrated.
•The Image Shift or Stage calibration process has been successfully performed for the magnification range being used.
See also
Acquisition Settings - Camera - MIA Clipping
Acquiring a stitched image
1.Activate the Camera Control tool window.
2.Select the MIA check box.
3.The button's function changes from Snapshot to MIA  .
.
3.Click the Live button and check the live-image.
4.Some cameras acquire images with a dark edge or image distortion near the edge. You can clip these edges. To do so, use the Acquisition Settings > Camera > MIA Clipping dialog box. You can find more information on this topic here.
5.Click the picklist next to the MIA button and select the number of images that you want to assemble into the stitched image. The selection determines how many images are arranged next to each other horizontally and vertically.
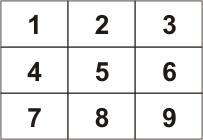
The illustration shows the 3x3 option. Three rows and three columns of images are acquired, containing nine images in total.
6.Click the MIA button.
7.The acquisition process starts.
8.After the acquisition process has finished, the images are assembled automatically and the stitched image is displayed in the image window.
00233 09032015