|
|
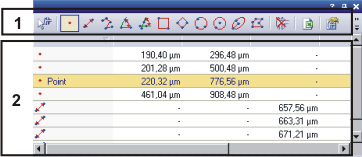
Use the Measurement tool window when you want to measure images. Use the View > Tool Windows > Measurement command to have the tool window displayed. Makeup of the tool windowThe tool window is made up of several groups. Click on one of the areas in the tool window shown schematically above, to jump to the corresponding help topic. (2) Measurement display in the tool window
|
|
Name of the button |
Description |
|
Measure the distance between two interactively determined points in a chart. |
|
|
Measure the horizontal distance between a reference line and one interactively determined point in a chart. |
See also
The toolbar in the Measurement tool window contains all of the measurement functions and numerous important options you can use when you are interactively measuring.
You will find a description of the toolbar's functions here.
Begin a measurement by clicking on the button with the measurement function you want. The button will appear clicked, thereby showing the active measurement function. You can recognize this status by the button's colored background.
You will remain in this measurement mode until you explicitly switch it off. To do this, click on the measurement function's button again.
This tool window is at the same time the measurement display and contains all of the values that have been measured on the active image. It is also possible to have all of the measurements that have up till then been made on loaded images, displayed. To do so, clear the Tools > Options > Measurement > Results > Show measurement objects > Only of the active image check box.
Note: To enable you to see the list of the measurements properly, the Measurement tool window should be docked on the lower edge of the user interface. Additional information on positioning tool windows can be found here.
By default the completed measurements will be sorted according to their measurement type in alphabetical order. The measurement type will be displayed in the Type column. You can, however, also change this order at any time. To do this, click in the measurement display, e.g. on the Type column header. The measurements will then be sorted in reverse alphabetical order. Clicking again returns the table to alphabetical order.
You can also change the sorting criterion and have the measurements sorted by every measurement parameter you wish, that is shown in the tool window, for example, by the measured area. To do so, click on the column header with this measurement parameter, in this example, Area.
You can change the order in which the measurement parameters are displayed in the Measurement tool window, however you want to. It is also possible to conceal measurement parameters that don't interest you and to have additional measurement parameters displayed. To do so, use the Select Measurements dialog box. A description of this dialog box can be found here.
In the Measurement tool window, you can freely assign a name for every measurement, in the Name column. Double click with your left mouse button in the Name column. A flashing cursor will appear. Enter a name for your measurement.
Select the Show name check box, located in the Tools > Options > Measurement > Measurement Display dialog box to have the name of the measurement object displayed in the image or chart.
3909 11032014