|
|
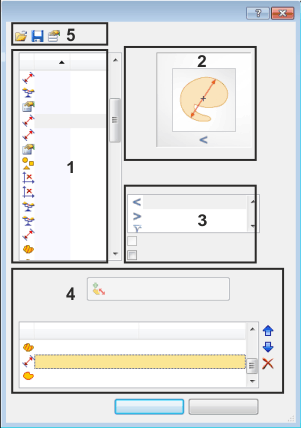
The Select Measurements dialog box offers you a range of measurement parameters for interactive measurement objects. To open the dialog box, click the Select Measurements button located in the Measurement tool window. What is a measurement object?With each measurement on an image you define a measurement object. Select, e.g., the Arbitrary Distance measurement function to measure the length of a distance between two points on an image. The measurement object corresponds to the structure to be measured. In this case, the measured line on the image is the measurement object. What exactly are measurement parameters?Measurement parameters are the things that you measure. In general, there are several measurement parameters that you can choose for a measurement object. For example, with the measurement object "Line", you can choose the length and its start and end points as measurement parameters. Selecting a measurement parameterIn the Select Measurements dialog box, you specify which measurement parameters are to be shown in the Measurement tool window when a measurement is made. You can hide measurement parameters that don't interest you, or make additional parameters appear. You can also alter the order of the measurement values in the Measurement tool window there. Description of dialog boxThe dialog box is divided into different areas. Click on one of the areas in the dialog box shown schematically above to jump to the corresponding help topic. (1) List of the measurement parameters (2) Description of measurement parameters (3) Derivation of complex measurement parameters (4) List of the selected measurement parameters (5) Administration of parameter sets See also (1) List of the measurement parametersAvailable measurementsThe Available measurements list contains the measurement parameters that are available. Derived measurement parametersFrom some measurement parameters other, more complex, measurement parameters can be derived. Please note that the derived measurement parameters will not be displayed in the Available measurements list. There you will find only the basic measurement parameters. You will find a description of the derived measurement parameters further below. Structure of the listThe measurement parameters will be divided into different object types. To which object type a measurement parameter belongs, stands in the Object Type column immediately next to the name of the measurement parameter. You can sort the list of all measurement parameters according to type. To do this, click the Object Type column header. This will give you a better overview of, for example, which measurement parameter is available for a 2D object. (2) Description of measurement parametersMost of the measurement parameters are described by a drawing and a text in the dialog box. In the list of all the measurement parameters, click on the name of a parameter to display the description. (3) Derivation of complex measurement parametersFrom some measurement parameters other, more complex, measurement parameters can be derived. In this case you will find the basic measurement parameters in the list of measurement parameters. Select the basis measurement parameter and define which measurement parameters are to be derived from it in area (3) of the dialog box. The following possibilities are available for deriving measurement parameters: Statistically evaluating measurement parameters Determining the orientation of a line
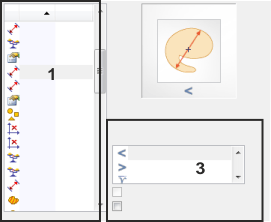
Statistically evaluating measurement parametersWith some measurement parameters, a lot of measurement values will be determined from the measurement object. Where the Diameter measurement parameter is concerned, first of all, the center of gravity of a 2D object will be determined. Subsequently, a large number of lines will be drawn through the center of gravity, and the intersection with the 2D object's outer edge determined. The Diameter is the length of the distance between the two intersections. A large number of values will be measured. However, only precisely one resulting value will be adopted in the measurement sheet. This resulting value can be either the smallest value, the greatest value or the mean value, of all of the measured diameters. Note: The same statistic functions are not available for each measurement parameter. Select a measurement parameter in the Available measurements list. Should statistic functions be available for this measurement parameter, they will now be displayed in the Select Interactive Measurements dialog box. For example: You are interested in the largest and smallest diameter of the measured 2D object. 1.Select the Diameter measurement parameter in the list of measurement parameters. 2.The statistic functions that are available for the selected measurement parameters will now appear below the explanation of the measurement parameters:
2.Click the statistic function Min in order to determine the minimal diameter. •The 3.Click the 4.Click on the statistical function Max, and then click the 5.The next time a 2D object is measured, the smallest and the largest diameter will be determined and will be shown in the Measurement and ROI tool window's measurement display. back to "Derivation of complex measurement parameters" Measuring the convex hullMeasurement parameters for 2D objects e.g., the area, can be calculated for the measurement object as you have defined it on the image. You can also first have the convex hull of a 2D object calculated and then have the area of this derived measurement object exported. Use this option in particular when you automatically define the measurement object, such as when using the magic wand.
The illustration shows a 2D object (orange) and the area of the convex hull (dashed). 1.Select a measurement parameter for a 2D object in the list of the measurement parameters. Select, e.g., the Area measurement parameter. 2.The Measure on convex hull check box will now become available. 2.Then select the Measure on convex hull check box. 3.In the drawing of the measurement parameter you will then see this icon 4.The button 3.Click the 4.The next time a 2D object is measured, the convex area will be determined and will be shown in the Measurement and ROI tool window's measurement display. back to "Derivation of complex measurement parameters" Determining the orientation of a lineThe result of a measurement for some measurement parameters for 2D objects, e.g., diameter, is a segment. With these measurement parameters, you can measure the orientation of the segment with regards to the X-direction. The orientation is the angle between the resulting segment and the X-axis. 1.Select, e.g., the Diameter measurement parameter in the list of measurement parameters. 2.Select either the Min or the Max statistical function. The mean diameter is a calculated value which is in any way oriented in the image. 3.The Measure the orientation check box will become available now. 3.Select the Measure the orientation check box. 4.Click the 5.You can also, in addition to the orientation, output the measurement parameter Min (Diameter). To do so, clear the Measure the orientation check box and click the back to "Derivation of complex measurement parameters" (4) List of the selected measurement parametersThe Measurements computed for all measurement objects list shows the selected measurement parameters. Only these measurement parameters appear in the measurement display and are exported into the measurement sheet. Please note, that the selected measurement parameters for all types of measurement objects are displayed here. For this reason, measurement parameters also appear in the measurement display that are not applicable to the object that has been measured. For example, no length measurements will be given to a 2D object, even if the Length measurement parameter has been selected.
1.To do this, select the required measurement parameter in the list of measurement parameters (1). 2.If necessary, change the settings for the selected measurement parameter (3). 3.Then click the Add <Measurement Parameter> button. Should the measurement parameter you've selected already be in the list of selected measurement parameters, this button will be gray and is not available.
1.To do so, select the measurement parameter you wish to delete in the Measurements computed for all measurement objects list. 2.Click the button with the red cross. 3.The deleted measurement parameter will, from that moment on, be deactivated for all measurements of this type. It, however, can be reactivated any time. 4.At least one measurement parameter must have been defined for each object type. For this reason you can't delete the last remaining measurement parameter for an object type.
1.To do so, select the measurement parameter you wish to move in the list Measurements computed for all measurement objects. 2.Click the arrow buttons to move the measurement parameter in the corresponding direction. (5) Administration of parameter sets
In this way you can determine the appearance of various measurement sheets.
5506 22042013 |

 Min,
Min,  Max,
Max,  Mean
Mean button shows the name of the active statistic function, e.g.,
 .
. If you do not want one of the measurement parameters, simply delete it from the list.
 You determine the order of the measurement parameters in the measurement display and the measurement results sheet. When you have the measurement results displayed in the image, your software will always show the measurement parameter for the object type that stands at the topmost position here.
 Click the
  Click the