|
Use the Image > Calculate Fourier Transform > FT on ROI command to compute a Fourier transform from a segment of the active image that you defined yourself. Alternatively, in the Fourier Transform tool window, click the FT on ROI button.
A square appears in the active image. You can resize it and move it within the image by pressing the left mouse button. To select a rectangular image segment, keep the [Shift] key pressed.
Prerequisite: This command is only available when the active document is a gray-value image. The command is shown in gray if the active image is an FT image, for example.
 Creating an FT image from the live-image Creating an FT image from the live-image
You can also create FT images from the live-image. You can use this option to help you focus, for example.
What does the link between images and FT images mean?
After the calculation of the Fourier transform, the FT image stays linked to the source image until you remove the link. This link has the following consequences in your software.
•As long as the FT image is linked to the source image, you will find both images in the document area of the Fourier Transform tool window. •On the source image, the image segment belonging to the FT image is displayed. As long as the FT image is linked to the source image, you can change the image segment. You can change it's size or move the entire image segment to a different part of the source image. The linked FT image is then updated accordingly, which means that the Fourier transform is re-calculated. •As long as the FT image is linked to the source image, it's header in your software's document group is displayed in color. The color field in front of the FT image in the Fourier Transform tool window and the rectangle which shows the image segment in the source image used for the Fourier transform have the same color. This way, you can easily recognize which FT images correspond to which image segments when several FT images are defined on one source image. See also
Overview - FT
Tool Window - Fourier Transform
16-bit gray-value image
FT image
Creating FT on ROI
1.Use the View > Tool Windows > Fourier Transform command to make the Fourier Transform tool window appear. 2.Load or acquire an image from which you want to create the Fourier transform. •All of the following steps also apply to the live-image. To calculate the FT in the live-image, first switch to the live-image. To do so, use the Acquire > Live command. 3.Use the Image > Calculate Fourier Transform > FT on ROI command. •The image segment is displayed with a colored rectangle in the image window. The rectangle's label contains the size of the image segment. You can change the size and position of the image segment by clicking the left mouse button.
•A new image window for the FT image is automatically created. This image window is displayed in its own document group to the right of the source image. This means that you can view the FT image and the source image at the same time. •The FT image is given the default name FT (ROI) <consecutive number> of <source image name>. The FT image's name is displayed in the Fourier Transform tool window and in the FT image's document title. Note: If the FT image isn't automatically arranged to the right of the source image, you may be in the document group's single frame view. In this case, switch back to the tile view. You can find more information on this topic here.
•The image and the FT image are displayed in the Explorer group in the Fourier transform tool window. Changing the size and position of the image segment that is calculated from the FT image
4.In the image window, select the rectangle that has the same color as the FT image's tab. Move the rectangle with the left mouse button depressed. •The FT image will be continually updated. Note: The selection of the image segment is only possible when you are in the edit-object mode. If you can't select the image segment on the source image, click the Selection Tool  button on the Toolbox toolbar. button on the Toolbox toolbar.
5.After the selection, selection markers are shown on the rectangle. In the image window, drag one of the selection markers to enlarge or reduce the size of the image segment. •If you want to compute the Fourier transform from a square image segment, keep the [Shift] key pressed while moving the handles. Possible image sizes are: 128x128, 256x256, 512x512, 1024x1024, 2048x2048.
Calculating more than one FT image from an image
6.In the Fourier Transform tool window, select a gray-value image for which an FT image has already been calculated. Gray-value images are identified by this icon  . . 7.Use the Image > Calculate Fourier Transform > FT on ROI command again. •A new image window for the FT image is automatically created. This image window will be created in the same document group that already contains the first FT image. 8.You can change the size and position of the image segment at this point. 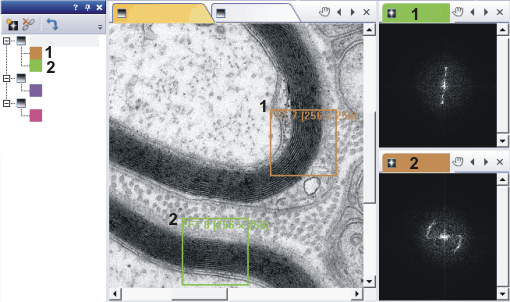
The user interface could look like this when you work with FT images. You can see the Fourier Transform tool window on the left-hand side. On the right-hand side you can see three image windows that contain the gray-value image and two FT images. The document groups are arranged so that all images can be viewed at the same time.
In this example, you can see two FT images of different image segments (1) and (2). The image segments show myelin membranes that are oriented differently. In the FT images, you can see that they are oriented differently.
back to top
4041 20032014
| 