|
|
The images that you acquire with your TEM camera are generally 16-bit gray-value images. Every pixel in a 16-bit gray-value image can take on one of 65536 intensity values. How do I recognize a 16-bit gray-value image? Displaying 16-bit gray-value images on your monitor Saving 16-bit gray-value images Exporting 16-bit gray-value images See also How do I recognize a 16-bit gray-value image?1.You can immediately recognize a 16-bit gray-value image because it has this icon 2.You can see what type an image is by looking at the Image > Type entry in the Properties tool window. For 16-bit images, the 16 bit Grayscale entry is displayed. 3.Alternatively, the Image > Mode command will also show you the image type. When it is a 16-bit gray-value image the Grayscale and 16 Bit / Channel menu entries will be marked. Displaying 16-bit gray-value images on your monitorOn the monitor, only 256 intensity values can be displayed. To be able to display a 16-bit gray-value image on your monitor, you must first define which intensity values are to be displayed and how they are to be displayed. As a rule, your software will automatically determine which are the image's smallest and greatest intensity values. The intensity range between the smallest and greatest intensity values will be divided up into 256 parts and displayed on your monitor.
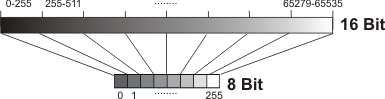
The illustration shows you how a 16-bit gray-value image's intensity values can be adopted in an 8-bit image. The upper bar contains the 16-bit gray-value image's intensity values. The lower bar contains the 8-bit gray-value image's intensity values. The 16-bit gray-value image contains far more intensity values than the 8-bit gray-value image. For this reason, the 16-bit gray-value image's intensity scale is divided into 255 parts, and each of these parts is allocated one of the 8-bit gray-value image's intensity values. The illustration shows that in this process a large number of intensity values have to be mapped to one single value. Manually setting the display of a 16-bit gray-value imageYou can also yourself determine how a 16-bit gray-value image is to be displayed on your monitor. To do this, use the Histogram group in the Adjust Display tool window. Saving 16-bit gray-value imagesNote: 16-bit gray-value images can only be saved in the TIF or VSI file format. Otherwise they loose a great deal of their image information during saving. Exporting 16-bit gray-value imagesOther application programs may well find it difficult to work with image data that has a data depth of 16 bit. Therefore, when you copy an image or an image segment via the clipboard, and insert it into another application program, it is quite possible that the image will then be displayed differently. Converting a gray-value imageYou can convert every image type that is supported into every other type. Note: Image information is generally lost when converting a 16-bit gray-value image into a different image type. You can e.g., convert a 16-bit gray-value image into a 24-bit true-color image. To do so, use the Image > Mode > RGB Color command. You can also convert a 16-bit gray-value image into an 8-bit gray-value image. To do so, use the Image > Mode > 8 Bit / Channel command. 00008 |