Various drawing functions for labeling your images are available.
Determining the default formatting for drawing objects
Editing existing drawing objects
Pasting drawing objects from one image onto another image
See also
Drawing objects and drawing layer
Overview - Commenting on images
Inserting drawing objects
Task
You want to insert and label an arrow on an image.
1.Load the image that you want to label.
2.Set the image window's zoom factor so that the image is displayed in the size with which you want the label to be most easily read. Rotate the mouse wheel, for example, to change the zoom factor in the image window.
3.Use the View > Toolbars > Drawing command to have the Drawing toolbar displayed.
Inserting an arrow
4.Click the Arrow  button on the Drawing toolbar.
•There is a button for each drawing object on the Drawing toolbar. Click the button with the drawing object that you want to insert and define the drawing object on the image.
5.In the image window, click where you want the arrow to start.
Keep the left button depressed, and move your mouse to the end point of the arrow.
Then release the mouse button.
6.


Use the buttons Line Color, Line Width, Line Style and Arrow Style to set the line's characteristics.
Inserting a text object
7.Click the Text  button on the Drawing toolbar.
8.With the left mouse button depressed draw the text object. Enter and format the text you want.
•You can find more information on text objects here.
Showing and hiding drawing objects
9.You can display the image and the drawing layer together, on your monitor, or alternatively the image without the drawing layer. Click the Show Drawings  button on the Drawing toolbar to switch between showing and not showing the drawing layer.
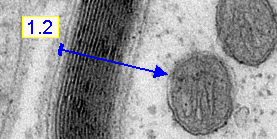
In the image, two drawing objects are now defined: the arrow and its label.
Duplicating drawing objects
1.Select the drawing object you want to duplicate.
2.Keep the [Ctrl] key pressed while you move objects.
3.You can also copy an object using the clipboard. To do this, select the object and use the [Ctrl + C] shortcut to copy it. Use [Ctrl + V], to paste the selected object from the clipboard into the same, or another document.
Selecting drawing objects
Selecting several objects
For certain actions it is useful to select more than one drawing object. In this way, you can, for instance, paste several drawing objects from one image onto another simultaneously, or simultaneously format several drawing objects.
1.Use the buttons in the Drawing toolbar, to create several drawing objects.
2.If necessary, switch to the edit-object mode. To do so, click the Select Drawing Objects  button on the Drawing toolbar.
When the button already appears clicked, you will already be working in the edit-object mode.
3.Use one of the following methods to select a collection of drawing objects.
4.Leftclick an object.
While keeping the [Shift] key depressed, click other objects you want to edit.
Objects you have selected will be identified by white or gray markers.
5.While keeping the left mouse button depressed, drag a rectangle to encompass several objects.
All objects that are completely inside this rectangle will be selected. All of the other existing selections will be deleted.
6.To select all of the drawing objects in a document, use the [Ctrl + A] shortcut.
Removing a selection
1.If necessary, switch to the edit-object mode. To do so, click the Select Drawing Objects button on the Drawing toolbar.
When the button already appears clicked, you will already be working in the edit-object mode.
2.There are several ways of clearing a selection of drawing objects:
3.Use the Edit > Deselect command.
4.Use the keyboard shortcut [Ctrl + D].
5.Click any place in the background of a document with your left mouse button. The complete current selection will be removed.
Determining the default formatting for drawing objects
1.Insert a drawing object on the image and assign it the properties that you want to have as your default settings. You can change the outline color from black to red, for example, if you want the lines that you draw on your images to be red by default.
2.If necessary, select the drawing object that you want to use as a template for the formatting.
To do so, click the Select Drawing Objects button on the Drawing toolbar. The button will appear clicked when the edit-object mode is active. You can recognize this status by the button's colored background.
3.Use the Draw > Set As Default For Drawings command. You will find the Draw menu on the Drawing toolbar.
4.The selected drawing object will then be used as a template for all new drawing objects.
4.Insert another drawing object, e.g., an ellipse.
5.The new drawing object will then be formatted in exactly the way you determined that the first drawing object should be.
Editing existing drawing objects
You can move existing drawing objects and change their size. You can change the drawing object's color and line width.
Prerequisite
To edit drawing objects, switch to the edit-object mode. To do so, click the Select Drawing Objects button on the Drawing toolbar.
When the button already appears clicked, you will already be working in the edit-object mode.
Moving drawing objects
1.Select the drawing objects you want to move.
2.Move the mouse pointer onto a selected object, and as soon as the pointer changes shape to a four-pronged arrowhead  , press the left mouse button. Keeping it depressed, you can drag the selected object to any position you want.
3.With the arrow keys on your keyboard, you can move the selected object one monitor pixel at a time in the direction the arrow points.
Changing the size of selected drawing objects
1.Move the pointer onto a marker. By dragging the marker with the mouse button depressed, you can adjust the frame's size as wished.

Note: Keep the [Shift] key depressed to retain the object's length/width ratio when you move one of the corners of the object. For example, in this way you can reduced or increase the size of an ellipse without distorting it.
Keep the [Ctrl] key depressed to keep the center point of the object constant.
Editing a drawing object's properties
1.There are several ways of changing a drawing object's properties:
2.Doubleclick on a drawing object or a group of drawing objects and a dialog box with drawing object properties will open.
The text object is an exception. Here you switch into the text-entry mode by doubleclicking.
3.Select the object, click your right mouse button and use the Properties... command in the context menu.
4.Select one or more objects and use the buttons on the Drawing toolbar.
See also
Erasing drawings
1.If necessary, switch to the edit-object mode. To do so, click the Select Drawing Objects button on the Drawing toolbar.
When the button already appears clicked, you will already be working in the edit-object mode.
2.Press the [Del] key on your keyboard to delete all of the selected objects in the active document.
Note: The [Del] key always deletes the active element. For example, if the Documents tool window has been activated, the image that has been selected in the tool window will be deleted.
Pasting drawing objects from one image onto another image
1.If necessary, switch to the edit-object mode. To do so, click the Select Drawing Objects button on the Drawing toolbar.
When the button already appears clicked, you will already be working in the edit-object mode.
2.Select the drawing object you want to copy.
3.Use the [Ctrl + C] shortcut to copy the selected drawing objects into the clipboard.
4.Activate the image into which you want to paste the drawing objects.
5.Display the entire image on your monitor. To do so, use, e.g., the Fit to Window  button located on the Zoom toolbar or display the Image Navigator tool window.
6.Use the [Ctrl + V] shortcut to paste the copied drawing objects into the drawing layer of the active image.
7.The drawing objects that have been copied will then be copied onto the same positions that they were copied to in the source image. When that isn't possible, because the source image is larger than the image into which you want to copy drawing objects, the drawing objects will at least be positioned in the same part of the image, e.g., the bottom right.
7.You can then position the copied drawing objects on the image, or process them.
00079 26032013