An image can be displayed in very different ways in your software's image window. There are several ways in which you can change the way your image is displayed.
Enlarging or reducing the size of the image in the image window
Changing an image's color mapping
See also
Setting the appearance of an image series
Enlarging or reducing the size of the image in the image window
There are several different ways to change your image's zoom factor in the image window. The current zoom factor is displayed on the bottom right in the status bar.
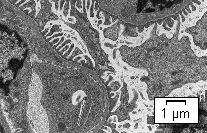
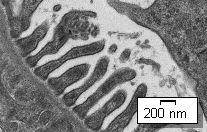
On the left, the whole image is displayed in the image window. On the right, the zoom factor has enlarged the image segment so that it can be viewed in higher resolution. The scale bar relates to the magnification of the image in the image window and is adjusted accordingly.
1.Use the buttons in the Zoom toolbar.
2.Click the Zoom Mode  button on the Toolbox toolbar.
3.If you are not in zoom mode: Right click on an image window. In the context menu you will find several commands with which you can alter the image's zoom factor.
4.Rotate the mouse wheel to change the zoom factor.
5.Select the Smooth movement while zooming check box to make the image in the image window zoom in and out smoothly. You will find this check box in the Tools > Options > Images > Zoom dialog box.
6.You can set whether you want to enlarge or reduce the size of the image in the image window when you move the mouse wheel forwards. To do this, check or clear the Zoom in the image by scrolling the mouse wheel away from you (forward motion) check box. You will find this check box in the Tools > Options > Images > Zoom dialog box.
5.Use the Image Navigator tool window.
6.In the Image Navigator tool window, while keeping the left mouse button depressed, drag the navigation frame to a smaller size. As soon as you release the mouse button, only the image segment you have selected will be shown in the image window.
7.Enter the zoom factor you want directly in the edit field in the Image Navigator tool window and press the [Enter] key, or use the slide control.
8.Use the commands of the context menu to adjust the zoom factor. You open the context menu by clicking the right mouse button in the Image Navigator tool window.
Settings for how the image is to be displayed in the image window
In the Tools > Options > Images > Details dialog box, you specify how images are to be made larger or smaller when they are displayed in your software's image window.
Changing an image's color mapping
You can display gray-value images in color. You can do this using color tables.
Task
Create a color table which displays dark gray-values in yellow, and light gray-values in different shades of red. And, the lighter the gray values are; the lighter the shades of red are to be.
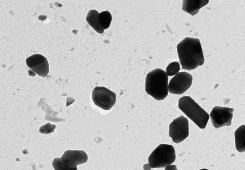
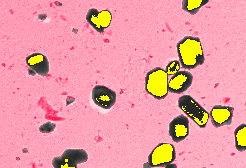
On the left is the gray-value image. On the right the image has been colored with a color table. The coloring allows you to see more details in the dark and light gray-value range.
Creating a color table
1.Load a gray-value image. Use, for example, the [Ctrl + Alt + T] shortcut to create a test image.
2.Use the Image > Pseudo color... command to open the Pseudo color dialog box.
•The current color table is shown in the Current Color Table group.

•A detailed explanation of the Pseudo Color dialog box can be found here.
3.Move your mouse pointer onto the color table in the dialog box.
4.Your mouse pointer then takes on the form of a hand.
4.While keeping the left mouse button depressed, drag the mouse over the lower gray values in the color table.
A blue bar under the color table indicates the gray-value range that has been selected. You can now assign this gray-value range a color.
5.Click the left color field in the Edit Color Table group once.
6.Select the required color, e.g., yellow, in the Colors dialog box, and confirm it with OK.
7.Click the right color field in the Edit Color Table group once.
8.Select the required color, e.g., yellow, in the Colors dialog box, and confirm it with OK.
9.Click the Apply button in the Edit Color Table group.
All of the current image's gray values that are within the selected gray-value range will then be displayed in yellow.
•The current color table will be correspondingly updated.

10.While keeping the left mouse button depressed, drag the mouse over the upper gray values in the color table.
A blue bar under the color table indicates the gray-value range that has been selected. You can now assign this gray-value range a color.
11.Click the left color field in the Edit Color Table group once.
12.Select the required color, e.g., dark red, in the Colors dialog box, and confirm it with OK.
13.Click the right color field in the Edit Color Table group once.
14.Select the required color, e.g., white, in the Colors dialog box, and confirm it with OK.
15.Click the Apply button in the Edit Color Table group.
All of the current image's gray values that are within the selected gray-value range will now be shown in either yellow or red. In contrast to the yellow pixels, the red pixels become constantly brighter, the higher their intensity value is.
The current color table will be correspondingly updated.

16.Close the Pseudo Color dialog box with OK.
•The active gray-value image is now displayed in color.
00270