|
|
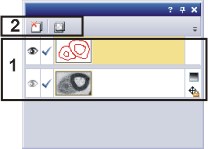
The Layers tool window shows all of the layers the active multi-layer image has. Every layer will be shown in its own row. You can make the individual layers appear or disappear, and you can also delete them. Should this tool window not be visible, use the View > Tool Windows > Layers command to show the tool window. Makeup of the tool windowThe tool window is made up of several parts. Click on one of the areas in the tool window shown above to jump to the corresponding help topic.
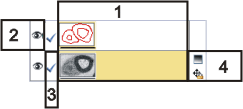
(1) List of the layersThe Layers tool window shows all of the layers the active multi-layer image has. Every layer will be shown in its own row. The field in the center (1) contains the thumbnail and the name of the layer. Within the row you will find a number of icons that supply information about the corresponding rows (2-4).
(1) List of the layersThe order in which the layers are shown in the tool window is fixed and cannot be changed. This order determines how the objects lie over one another. All of the objects in the topmost layer also lie on top, and cover the layers beneath them. All layers are given a standard name. You can change this name at any time. To do so, doubleclick on the layer's name. Then enter the name you want and confirm it with the [Enter] key.
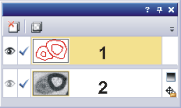
A multi-layer image can contain both image layers (2) and vector layers (1). Drawing objects, measurement objects and annotations will be inserted into a vector layer. A vector layer contains no image data. The vector layer is transparent everywhere where there are no drawing objects. As an example, this illustration shows you an image on which several drawing objects have been defined. You will find more information on the image and vector layers here. (2) Eye icon
|
|
Delete a layer. |
|
|
Change the opacity of image layers. |
 Deleting a layer
The Layers tool window lists all of the active image's layers.
1.To delete a layer, you must first select it. To do so, simply click the layer's name.
2.The layer you have selected will then be shown with a colored background in the tool window.
2.Then click the Delete Layer button. You will find this button below the tool window's header.
3.In this manner you can, for example, remove all of the drawing objects in an image with one mouse click.
 Setting layer opacity
When you display several image layers simultaneously in the image window, the image layer that lies on the top covers all of the image information that lies beneath it. You can make the top image layers transparent and in this way make the image information beneath them recognizable.
1.To start with, select the image layer in the Layers tool window. To do so, simply click the layer's name.
2.The layer you have selected will then be shown with a colored background in the tool window.
3.The button is not available for the lowest layer because this layer doesn't cover any other layers.
2.Then click the Set Layer Opacity button. You can find this button in the tool window's toolbar.
3.In the tool window a slide control will then appear, with which you can set the degree of transparency.

3.Use the slide control to set the degree of transparency you want. At a value of 100% the image layer is opaque. At a value of 0% the image layer will be completely faded out.
4.When you're satisfied with the transparency setting, click once on any place on the user interface.
An image can be made up of different layers. A multi-layer image is made up of two or more layers. A layer can contain drawings and/or measurement results. Depending on how the multi-layer image has been created, the different layers can have considerably different properties.
Images with drawings |
Use the Drawing toolbar to insert additional information in the form of labeling, markers or drawings, into an image. All drawing objects will be written into their own layer, the drawing layer. |
Images with measurements |
Use the Measurements tool window to define measurement objects in an image. All measurement objects will be written into their own layer, the measurement layer. |
Although the information each image layer provides is saved in one single file, the image file, the layer information can still be separated. Should you change the information contained in one layer, this will, therefore, not have any effect on the other layers. Furthermore, you can, at any time, make an individual layer disappear, or delete it. To do this, use the Layers tool window's functions.
Note: The individual layers will only be saved separately when you use either the TIF or VSI file format to save them. If you use any other file format the data will be irrevocably lost when you save the image.
3847 27022014


 button. You can find this button on the

 =
=  =
=  =
=