Your software offers you numerous morphological filters. This enables you to process the shape of objects.
Prerequisite: The morphological filters are only available when the Detection software solution has been purchased and is active.
Example: You want to count how many objects there are in an image. Some of the objects are in contact with one another and need to be separated before you can count the objects properly.
You solve this task in several steps:
Preparing for the automatic object analysis
See also
Overview - Morphological Filter
Binarizing the image
Some morphological filters, for example the Distance Bright filter, only work with binary images. A binary image only contains two colors, black and white. Where the separation of objects is concerned, the objects that are to be separated have to be white, the background, in contrast, has to be black.
1.Load a suitable image, or acquire one.
2.Use the Image > Mode > Binary... command to open the Binary dialog box.
3.Delete all but one of the phases by clicking the Remove Phase  button.
4.Click the New Threshold  button, then click a pixel that is to belong to the phase.
5.In this process an initial value will be set for the phase. All of the pixels that have the same color value will be colorized in the image. Your mouse pointer will have changed into a pipet with plus icon  .
.
5.Click the next pixel that is likewise to belong to the phase. Always click a pixel once only, and by doing so, add the required image structures to the phase step by step.
6.The boundary between different image structures can, in certain cases, already be crossed with just one click, so that under certain circumstances, image structures will be counted as part of a phase to which they don't belong.
6.Should you have clicked once too often, click the Undo Pipet  button. That will undo your last step.
7.When the phase has been completely detected, click OK.
8.The image is then binarized and is black and white.
9.All of the gray values that lie within the defined threshold values will be set to the value of 255 (white).

Preparing for the automatic object analysis
You can use morphological filters as a preparation for the automatic object analysis.
Filling holes
Holes in an object can lead to mistakes when the separation is carried out, because it's quite possible that the morphological filter will slice through the object at the place where holes are found. Therefore, close the holes before you start to separate the objects.
1.Use the Process > Morphological Filter > Close... command.
2.The dialog box for image processing operations will open.
2.Click the Actual Pixels  button to have the image displayed in the optimal size on your monitor.
3.Now, you can also recognize small holes in the objects.
4.A rectangle appears in the image window. The image segment that it contains is displayed in the dialog box's preview area. You can drag this rectangle around the image window to select a suitable image segment.
3.In the Lattice list, select the shape of the neighborhood. For the example image, select the Hexagon entry.
4.You'll find more information on the influence the neighborhood has on the resulting image here.
4.Move the Iterations and Size slide controls until the holes have been filled. For the example image, select the value 2 for Iterations and the value 1 for Size.
5.Click OK.
6.You'll find the source image on the left and the resulting image on the right-hand side. The holes within the object have been filled.


Removing noise
It's possible that there are small objects in the image which were created by noise in the image background and which are not to be included in the count.
1.Use the morphological filter Open to remove small objects.
2.You can find additional information on the Open filter here.
Separating objects
2.Use the Process > Morphological Filter > Separate Objects... command.
3.The dialog box for image processing operations will open.
3.Click the Actual Pixels button.
4.Select the Boundary shape > Dark option, as the objects are bright.
5.Select the Results > Burn black option to separate bright objects with dark lines.
6.Select the Connectivity > 8 Neighbors option. If too many separation lines have been found, you can use the 4 Neighbors option instead.
7.Move the Fine / Coarse slide control and observe whether the objects are then correctly separated. The higher the value is, the lower will be the number of separation lines that are found in this example image.
8.Click OK.
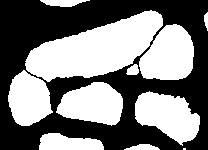
•The objects have been separated from one another.
Counting objects
1.In the Count and Measure tool window, click the Automatic Threshold... button to open the Automatic Threshold dialog box. Should the Automatic Threshold button not yet be active, you will have to first activate it. To do so, select the Automatic Threshold... entry in the Threshold button's menu. You open this menu by clicking the small arrow next to the button.
2.The threshold values are set automatically in the Automatic Threshold dialog box.
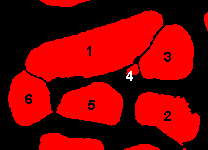
3.All of the objects that have been detected will be displayed in color.
2.Select the Dark option in the Background group.
3.Click the Count and Measure button.
4.In the Count and Measure Results tool window, you can see which, and how many objects have been found.
Counting without separating objects
Compare which, and how many, objects are found in the source image without the image separation.
5.In the Automatic Threshold Computation dialog box, select the Bright option in the Background group.
•In the Count and Measure Results tool window, you can see which, and how many objects have been found.
•You'll find the resulting image without object separation on the left and with object separation on the right-hand side. After the object separation has been made, more and smaller objects will be found.

00610 02122014