The dialog box for image processing operations offers you several special options for morphological filters. You can open the dialog box for image processing operations by using the Process > Morphological Filter > Erosion command.
See also
Overview - Morphological Filter
Settings for the morphological filters
Selecting a pixel's neighborhood
You can choose the neighborhood for the following morphological filters: Erosion, Dilation, Open, Close, Gradient, Top Hat Bright, Top Hat Dark.
In the Settings segment of the dialog box for image processing operations, you'll find the Lattice picklist, from which you can choose the shape of a pixel's neighborhood. Use the Size slide control to choose the size of the neighborhood. Use the Iterations slide control to choose the number of times the filter is to be applied. With every cycle, the filter will be applied to the image resulting from the previous cycle.
The settings always apply to the selected filter. When you choose another filter, check that the settings are suitable for it, or make other settings.
The influence a pixel's neighborhood has on the resulting image
A morphological filter compares the central pixel's value with the values of the pixels in the neighborhood that has been set. With the Erosion filter, for example, in the resulting image, the central pixel is assigned the minimum gray value of all of the pixels in the neighborhood, with the Dilation filter, the maximum value.
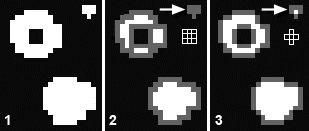
The illustration shows how the shape of a pixel's neighborhood influences the results of an erosion. On the left, you see the source image (1), in the middle, the resulting image for the Erosion filter with a 3x3 neighborhood (2) and on the right, the resulting image for the Erosion filter with a cross-shaped neighborhood (3). With an erosion, the pixels on an object's edge are taken away. The source image contains three objects that have been made smaller by the erosion.
In the illustration, all of the pixels that are black after the erosion, are shown in gray. Take a look at the pixel that is pointed out by an arrow. When the pixel is assigned a square 3x3 neighborhood (2) two black pixels are still in the neighborhood. The central pixel then becomes black from the erosion. When the pixel is assigned a cross-shaped neighborhood (3) the central pixel is only surrounded by white pixels, the erosion then doesn't change it.
In general, one can say that when the larger neighborhood is assigned, the effect of the erosion is stronger. Therefore, when the erosion takes place with a 3x3 neighborhood, the circular object (2) is broken down into three individual objects, while when the erosion takes place with a cross-shaped neighborhood (3) the object remains in one piece.
00600 23112011