|
|
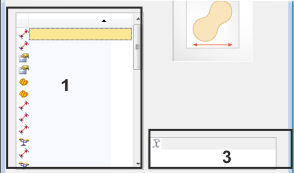
The Select Class Measurements dialog box offers you a range of measurement parameters for object classes. In it, you specify which measurement parameters for object classes are to be output in the Count and Measure Results tool window. You can hide measurement parameters that don't interest you, or make additional parameters appear. You can also change the order of the measurement parameters in the Count and Measure Results tool window, here. Opening the dialog boxYou can open this dialog box from both the Class Measurements, and Class Histogram results views by clicking the Select Class Measurements button. Alternatively, you can also open the dialog box by clicking the Count and Measure Options Description of dialog boxThe dialog box is divided into different areas. Click on one of the areas in the dialog box shown schematically above to jump to the corresponding help topic. (1) List of the measurement parameters (2) Description of measurement parameters (3) Statistically evaluating measurement parameters (4) List of the selected measurement parameters (5) Making class measurements available (6) Administration of parameter sets See also Overview - Automatic image analysis Results view - Class Measurements (1) List of the measurement parametersThe Definition of Class Measurement group displays a list of all of the available measurement parameters. Click a measurement parameter to obtain an image and a brief description in the right-hand part of the dialog box. Derived measurement parametersNumerous measurement parameters for classes are derived from measurement parameters for objects. For example, the mean object area is based on the Area measurement parameter for objects. A measurement parameter of this type will only be available in the Select Class Measurements dialog box, when it has previously been selected in the Select Object Measurements dialog box. When you delete a measurement parameter in the Select Object Measurements dialog box, that also goes into class measurements, you will receive a message that it will also be deleted in the Select Class Measurements dialog box. You can define some measurement parameters, Mean (Area) for example, for both class and ROI measurements. It will mean different things, though: In a class measurement, the parameter tells you the mean area of a class for all ROIs. In a ROI measurement, the parameter tells you the mean area of all objects in a ROI, for all classes. (2) Description of measurement parametersMost of the measurement parameters are described by a drawing and a text in the dialog box. In the list of all the measurement parameters, click on the name of the parameter to display the description. (3) Statistically evaluating measurement parametersAll of the measurement parameters for object measurements can also be used for class measurements. As class measurements they are statistically evaluated. As a rule, the mean measurement value for the objects in the class is output. The Mean (Area) measurement parameter, for example, tells you the mean area of the objects in a class. With some measurement parameters, the sum of the measurement values can also be output. The Sum (Area) measurement parameter displays the size of the area that all the objects in the class take up on the image, for example. In the list of the measurement parameters, (1) you will find the measurement parameters for the object measurement, for example, the area. To the right (3) you can choose whether you want to output the mean value or the sum of the areas for the class measurement.
Example: As object measurement, the Perimeter measurement parameter is output for every single object. When the Perimeter measurement parameter is selected as the class measurement, the mean perimeter of all the objects in the class will be output. (4) List of the selected measurement parametersThe Measurements computed for all classes list shows the selected measurement parameters. Only these measurement parameters appear in the results sheets.
1.To do this, select the required measurement parameter in the list of measurement parameters. 2.Then click the Add <Measurement Parameter> button. Should the measurement parameter you've selected already be in the list of selected measurement parameters, this button will be gray and is not available.
1.To do so, select the measurement parameter you wish to delete in the Measurements computed for all classes list. 2.Click the button with the red cross. 3.The removed measurement parameter will be immediately deactivated. It, however, can be reactivated any time.
1.Select the measurement parameter you wish to move in the Measurements computed for all classes list. 2.Click the arrow buttons to move the measurement parameter in the corresponding direction. 3.The first measurement parameter that is shown in the list, is then the first in the results sheet and so on. (5) Making class measurements availableTo make a measurement parameter available for a class measurement, it must first stand in the list of the selected measurement parameters, in the Select Object Measurements dialog box. Should a measurement parameter not be available in the list of the class measurements, you can add it by doing this: 1.Click the Select Object Measurements button to switch to the Select Object Measurements dialog box. •You can find more information on this dialog box here. 2.In it, add the required measurement parameter to the Measurements computed for all objects list. 3.The measurement parameter will then subsequently stand in the Select Class Measurements dialog box and be available for making class measurements. (6) Administration of parameter sets
In this way you can determine the appearance of various measurement sheets.
See also 5530 28112014 |

 button, located in the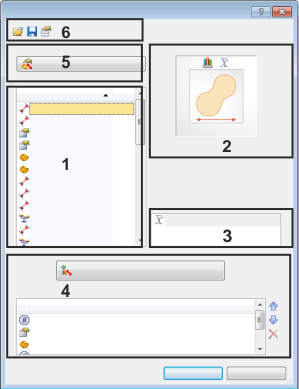
 You can show measurement parameters that are not available at present.
 If you're not interested in one of the measurement parameters, hide it in the results views.
 You can specify the order of the measurement parameters in the results sheets.
 Click the
  Click the
  Click the