|
|
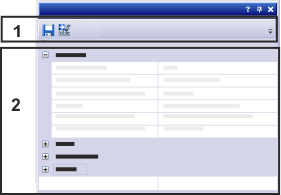
Should this tool window not be visible, use the View > Tool Windows > Properties command to show the tool window. What information is shown in the tool window?The Properties tool window will show you the available information on a loaded document. Which data is available depends on the document. If, for instance, an image was acquired with your software, considerably more information will be available than when you load an image from another application program. Note: Most of the data will only be saved along with your image when you use the TIF or VSI file format. If you use any other file format, the data will be irrevocably lost when you save the image. Displaying information from the tool window in the imageUse the View > Info Stamp command, to have information from the tool window displayed in the image window. You may possibly need to first select the information you want, in the Tools > Options > Info Stamp > Properties dialog box. Structure of the tool windowThe tool window is made up of several parts. Click on one of the areas in the tool window shown above to jump to the corresponding help topic. (1) Toolbar of the tool window (2) Information about the active document (1) Toolbar of the tool windowIn the Properties tool window, a number of buttons are at your disposal on the toolbar.
(2) Information about the active documentTo help you keep track of everything, every piece of information is allotted to a functions group. You can reduce every information group to a header. This enables you to hide information that doesn't interest you. Click the minus sign In the following text several types of information will be described. Depending on which system you work with, you may find some data that your camera or software version does not make available. Inversely, it is possible that in your software version also information is available that is not described here. DocumentThe Document information group, you can find for every type of document that your software supports. You can find an overview of document types here. It contains important information regarding the loaded document. Some of the fields in this information group can be edited. Here you can enter your own information that you can then save together with the document. Name = Document name. The document name is synonymous with the file name if the document has already been saved as a file. As long as a document has not yet been saved, you can edit the document name in the Properties tool window. To do so, simply click into the Name field and enter another document name. Path = File name with the complete file path. You will not find this field until the document has been saved. Immediately after the image acquisition the field is not yet there. Author = User who acquired the image. The name supplied will be the name under which the user is logged-on in the operating system. You can also change the name of the user here. To do so, simply click the Author field and enter another name. This field will remain empty for images that were not acquired with your software. Creation Time = Date and time of creation. Note = Comment. Enter a comment about the image here. Should you have specified an image comment for the image acquisition, in the Camera Control tool window, the Note field will already contain this image comment. You can, at any time, edit this comment, in the Properties tool window. Company = When your software is installed, your company's name has to be entered. This name will be saved as information with every image that is acquired with this software. Product Version = Exact description of the software version with which the image was acquired. You will only find this information for images that you have acquired with your software. File Size = Size of the saved file. You will not find this field until the document has been saved. Immediately after the image acquisition the field is not yet there. back to "Information about the active document" ImageLayer = Your software supports multi-layer images that are made up of two or more layers. A layer can contain drawings and/or measurement results, but it can also contain complete images. The Layer field specifies the name of the active image layer. Layers with drawings and/or measurement results are vector layers and aren't shown here. Frame Count = Number of individual frames in a multi-dimensional image, a time stack for example. Type = Image type. Possible entries are 16 bit Gray Scale and 32 bit Complex. Size (pixel) = Image size in pixels Size (calibrated) = Absolute image size in units of length. You will only find these values for images that you have acquired with your software. Images that were acquired with another application program will not be calibrated. For these images this field is therefore not present. Calibration (X) / Calibration (Y) = pixel calibration values. The value specifies the absolute size of a pixel. Memory Usage (uncompressed) = Amount of memory required for the loading of the image. Please note that this value is not identical with the file's size when you have saved this image as a file. The file size depends largely on the image file format and the compression method used. When you save an image in the JPG file format and compress it using the JPEG procedure, this will greatly reduce the size of the file you store. back to "Information about the active document" MicroscopeThe Microscope information group contains the current microscope settings for image acquisition and the parameters from the Microscope Control tool window. Below, only a few selected parameters are described. Microscope Frame = microscope name High Voltage = high voltage used for image acquisition Magnification / Camera Length = Depending on the display mode you are using, the magnification or the camera length used for the acquisition are displayed. Imaging mode = Display mode used by the microscope for image acquisition Microscope Type = Type of microscope Stage Position (X) / Stage Position (Y) / Stage Position (Z) = Stage positions for image acquisition Stage Tilt (α) = Tilt angle of the sample holder Device Configuration Name = hardware configuration that was used back to "Information about the active document" CameraThe Camera information group contains the acquisition parameters from the Camera Control tool window, and the current camera settings. You can find a description of all of the parameters together with the description of the camera settings. Below, only a few selected parameters are described. Manufacturer = Name of the manufacturer Camera Name = Name of the camera Exposure Time = Exposure time used for the acquisition. Binning = Binning value. With a binning value of 1 the image will have been acquired with the maximum camera resolution. With binning values greater than 1 the resolution will have been reduced for the acquisition. Shading Correction = selected shading correction. Possible entries are: Off (the image was not corrected), Dark (the image was only corrected with the dark correction image), Flatfield (the image was corrected both with the dark correction image and with the flatfield image). Enhancement / Brightness / Contrast = the values for image contrast, image brightness and enhancement of the intensity that were used for the acquisition. Gamma = Correction value that changes the image contrast in relation to the intensity of a pixel. Averaged Frames = If several frames were averaged for the image acquisition, the number of images that were averaged is displayed. Pseudo Color Mode = Use of pseudo colors for display on the monitor Snapshot Drift Correction = This field indicates whether snapshot drift correction was selected for the image acquisition or not. back to "Information about the active document" 3892 26082014 |



 next to the name of an information group, to reduce this group to a header. Click the plus sign
  to have all of the information displayed again.