|
Prerequisite: The command is only available when you start the software as Administrator or Power User. You can find more information on the different user roles here.
Your software has to know which hardware components your microscope is equipped with. Only these hardware components can be configured and subsequently controlled by the software. You enter the details of the hardware components that are available, in the Acquire > Devices > Device List dialog box.
Note: Which entries the picklist offers you will, for a number of its listings, depend on which hardware components you chose when you installed the software. For this reason, the dialog box can have a somewhat different appearance to the one described here.
Preselecting during the software installation
The contents of the picklists in the Device List dialog box will, for certain hardware components, depend on the settings that were made when the software was installed. You can, for example, select only those cameras that you specified when you installed the software.
Should you have forgotten any hardware components when you made the software installation, or have chosen the wrong components, simply update the software or install it once more with the correct entries.
Description of dialog box
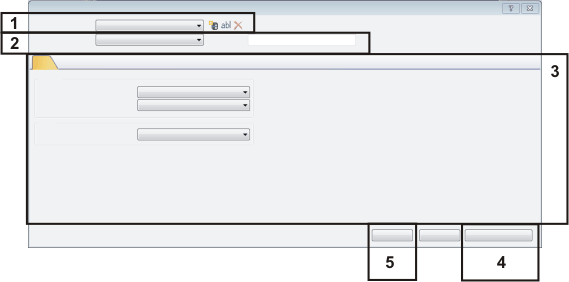
The dialog box is divided into different areas. Click on one of the areas in the dialog box shown above to jump to the corresponding help topic.
(1) Selecting and creating a hardware configuration
(2) Selecting the microscope
(3) Setting up the TEM
(4) Selecting the interfaces
(5) Confirming the device list with the currently used hardware components
See also
Overview - System Configuration
Device Settings
(1) Selecting and creating a hardware configuration
The Configuration field shows the current hardware configuration. All of the settings you make in the Device List dialog box refer to this hardware configuration.
"Standard" hardware configuration
When you start your software for the first time, the Standard hardware configuration will be automatically set up. You can use this hardware configuration, and continue to work with it.
 Creating a new hardware configuration Creating a new hardware configuration
In certain cases, it does, however, make sense to set up several hardware configurations. To do so, click the Create New Hardware Configuration button.
 Renaming a hardware configuration Renaming a hardware configuration
Click this button to rename the current hardware configuration.
 Deleting a hardware configuration Deleting a hardware configuration
Click this button, to delete the current hardware configuration from the Device Settings dialog box. If you want to protect a hardware configuration from being inadvertently deleted, save it as a file.
You can only delete a hardware configuration when at least two hardware configurations are defined.
back to top
(2) Selecting the microscope
Select the microscope you use, in the Microscope list.
In the Model field, enter the microscope frame you use. This information will be saved as a part of the image properties and will be displayed in the Microscope Frame field, in the Properties tool window. It makes sense to do this when you, for example, use a microscope without remote control. In this case, the information regarding the microscope frame that was used is not automatically added to the image properties.
When you use a microscope without remote control
If you're using a microscope without remote control, select the TEM Without Remote entry. You can find more information on this topic here.
back to top
(3) Setting up the TEM
On the TEM tab, select the camera and the stage.
Selecting a camera
The Side-mounted Camera and Bottom-mounted Camera picklists in the Camera group contain all of the cameras that your software supports. Select the camera you use. If your sample holder can't be controlled by remote control, select the Not used entry.
Selecting the stage
Select the sample holder that is installed on your TEM from the Sample Holder list. If your sample holder can't be controlled by remote control, select the Not used entry.
back to top
(4) Selecting the interfaces
Click the Interfaces... button to inform your software by which interfaces the microscope components are connected to your PC.
back to top
(5) Confirming the device list with the currently used hardware components
Confirming the device list
Make sure that your hardware components have been correctly entered in the Device List dialog box, and, if necessary, alter the settings. Click the OK button to close the Device List dialog box. Your software will then know which hardware components are available.
Configuring hardware components
In a further step, you have to configure these components, i.e., enter more detailed specifications for each component. To do this, use the Acquire > Devices > Device Settings dialog box.
Should you have changed the device list, this dialog box opens automatically when you close the Device List dialog box.
back to top
2101 20032014
|