In the Images > Details dialog box, you'll find several very special settings.
Opening the dialog box
To open this dialog box, use the Tools > Options... command and select the Images > Details entry in the tree structure.
Image rendering algorithm
Displaying images in the image window
Only with a zoom factor of 100%, can you optimally view image details on your monitor. Only at this zoom factor will one pixel be displayed as precisely one monitor point. However, where very large images are concerned, you'll only be able to see a very small image segment using a zoom factor of 100%, which means that you'll usually have to reduce the size of the image in the image window. Conversely, you can also enlarge images in the image window.
In the Image rendering algorithm group, you specify how images are to be made larger or smaller when they are displayed in your software's image window.
Making images in the image window larger
Select the Nearest neighbor entry in the Upscaling method list. Now, pixels in the gray/color value of the original pixels will be added. For example, when you use a zoom factor of 200%, one pixel in the source image, will appear as four pixels of the same gray/color value in the resulting image. When you use high zoom factors, you can clearly recognize the individual square pixels in the image window.
Select either the Upscaling method > Bilinear or the Bicubic option, to average neighboring pixels in the source image when you enlarge an image in the image window via the gray values or color values.
When the cubic interpolation is used, considerably more pixels will be taken into account than when the linear interpolation is used. Cubic interpolation produces a resulting image that looks sharper and better than when a linear interpolation is used. However, the calculation takes longer, and where there are sharp contrast transitions "overshooting" can occur.
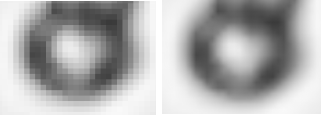
The illustration shows an image segment that has been highly enlarged. On the left, the image has been enlarged in the image window using the Nearest neighbor method. On the right, the Linear method was used.
Making images in the image window smaller
Select the Use supersampling when downscaling the image check box, when you want to make an image in the image window much smaller. An interpolation method that makes the small image look better is now used. However, reducing the size of the image also increases the calculation time.
Changing the appearance of the bottom layer of multi-layer images
The Ignore transparency mask when rendering last visible layer button effects the way that multi-layer images are displayed.
Your software supports multi-layer images that are made up of two or more layers. A layer can contain drawings and/or measurement results, but it can also contain complete images. The Layers tool window provides you with access to the different layers within a multi-layer image.
You can also display individual layers transparently, to make it possible for you to simultaneously view image information coming from several layers. When you make the bottom image layer transparent, the canvas lying under this image will become visible.
Images of different sizes can also be combined into a multi-layer image. When the image at the bottom is smaller than one of the images above it, the canvas lying right at the bottom will also in this case, become visible.
You can determine the appearance of the canvas in the Canvas group located in the Options > Images > General dialog box.
Select the check box if you want to ignore the current canvas settings. The background color of the current image is then used as a canvas if possible.
3300 25032014