|
|
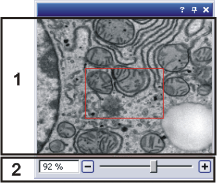
Using the Image Navigator tool window makes it easy to determine which segment of the image you want to have displayed in the image window. Should this tool window not be visible, use the View > Tool Windows > Image Navigator command to show it. Structure of the tool windowThe tool window is made up of several parts. Click on one of the areas in the tool window shown above to jump to the corresponding help topic. (1) Image area in the tool window (2) Slide control in the tool window See also Using the "Image Navigator" tool window Image area in the tool windowThe image navigator shows a smaller version of the active image, from the document group. This thumbnail always shows the complete image, regardless of the zoom factor used for the image in the image window. Navigation frameOn the navigation image, a red rectangle represents the navigation frame. Since, after having been loaded or acquired, the image is always shown completely, the navigation frame initially has the same size as the image itself. In the case of a higher zoom factor, the navigation frame becomes accordingly smaller. It shows the section of the image that is currently on display in the image window. You can change the size of the navigation frame and by doing so, change the image's zoom factor. Move the navigation frame in the image area displayed in the tool window, and by doing so, change the image segment on display. Slide control in the tool windowUse the slide control in the Image Navigator tool window to change the zoom factor of the current image from the document group. Enter the zoom factor you want directly in the edit field in the Image Navigator tool window and press the [Enter] key, or use the slide control. The zoom factor must be entered as a percentage. For example, to zoom an image to its original size, you enter 100. One pixel will then be displayed precisely as one monitor point. With a zoom factor of 50, the image will only be displayed half as large in the image window. 3817 |