Your software offers, depending on the task set, several layouts in which you will find different toolbars and tool windows in various arrangements.
See also
Activating a layout
There are several ways in which you can activate a layout.
1.Use the View > Layout command to open a menu containing all of the available layouts. Select the layout you want from this menu.
2.You will find a tab for the predefined layouts at the top right corner of the user interface. Click the name of the desired layout (1).
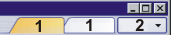
3.You will find the Layout (2) button next to the layout tabs located to the right side of the menu bar. Click this button to open a menu with all of the available layouts. Select the layout you want from this menu.
Editing layouts
Editing existing layouts
You can change an existing layout at any time. Use, for example, the commands in the View menu to have the individual elements of the user interface shown or hidden. By doing so you automatically change the current layout.
Changes made in layouts will be automatically saved. When you close your software, then restart it, you won't see the layout as it was defined, but instead, the layout as you have changed it.
Resetting layouts
If you want to restore a layout to the way it was defined, use the View > Layout > Reset Current Layout command.
Changing toolbars
You have not only the possibilities of hiding or showing the user interface's elements and changing their size and position. As well as that, you can also change existing toolbars, or even set up your own. These changes are not saved in the layout, but instead, in the configuration. They will remain available to you, even when you return the layout to its standard form.
Setting up your own layout
Task
You wish to define your own layout for the image acquisition. The layout is to contain the two tool windows Camera Control (1) and Gallery (2) and the Standard (3) toolbar. Position the Camera Control tool window at the bottom of the user interface, and the Standard toolbar to the right of the document group.
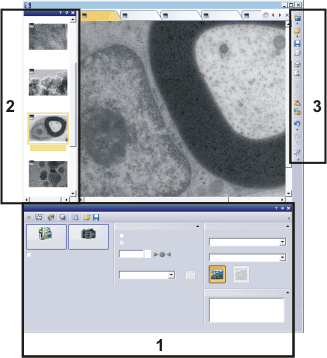
Hiding existing tool window and toolbars.
1.Close all of the tool windows on the user interface. To do so, click, e.g., each time the Close  button located at the top right in the tool windows.
2.Close all of the toolbars that are on display. Use the View > Toolbars command to open a list of all available toolbars. Select all of the toolbars indicated by a check.
Switching on the expert mode
3.Tool windows can only be moved in the expert mode. Therefore, switch to the expert mode.
To do this, use the Tools > Options... command. In the tree view, select the Environment > General entry. Select the Expert mode option in the User interface group.
Close the dialog box with OK.
Defining the layout
4.Put the tool windows and toolbars that you want on display.
Use the View > Tool Windows > Camera Control command.
Use the View > Tool Windows > Gallery command.
Use the View > Toolbars > Standard command.
5.Drag&drop the Camera Control tool window by its header, into the middle of the user interface. In the middle and on the edges of the user interface arrows appear to show you where you can dock the tool window. Drag the tool window onto the arrow at the bottom of the user interface, then release your mouse button.
6.Use the same method to position the Gallery tool window next to the document group on its left-hand side
7.Release the Standard toolbar from the user interface.
A docked toolbar has a small handle  on its left-hand side. Drag&drop the toolbar by this handle to release it from the user interface.
8.Dock the Standard toolbar next to the document group on its right-hand side. Drag&drop the toolbar by its header to a position next to the document group on its right-hand side.
•As soon as your mouse pointer touches the edge of the user interface, the toolbar will automatically be docked on this edge.
9.Use the View > Status Bar command to make the status bar disappear. In this way you enlarge the area available for displaying images.
Saving a layout
1.Use the View > Layout > Save Current Layout As... command.
2.The Save Layout As dialog box opens.
2.Enter a name for your layout, e.g., "MyLayout", in the Name field. You will always be able to find the layout in the list of available layouts under this name.
3.In the Access options, at the bottom of the dialog box, you specify whether the layout is to be available only to yourself, or to all of the users.
4.Click the Save button.
5.The layout contains the toolbars and tool windows that are currently on display, and also their arrangement in the user interface. Whether the menu bar or the status bar are to be on display is also saved along with the layout.
6.Now, you can restore the saved layout at any time. To do this, use, e.g., the View > Layout > <Own Layout> command.
7.Note: Its not possible to have more than six layouts displayed at one time. If more than six layouts have been defined you'll have to hide some of them. To make this possible, the Manage Layouts dialog box will be automatically opened. In it, clear some of the existing layouts to make it possible to save the new one.
5.Then the layout has been completely defined. Now, you can restore this layout at any time. To do so, use, e.g., the View > Layout > MyLayout command.
Editing the list of the layouts
1.Use the View > Layout > Manage Layouts... command.
2.The Manage Layouts dialog box contains a list of all of the layouts that have been defined.
2.Select your layout. You have the following options for editing your layouts:
3.Renaming a layout:
Click the button with the three points [...] in the Name field to be able to edit the layout's name.
4.Changing the access settings:
Click the arrow button in the Access field to open a menu with the two options Private and Public. Select the setting you want.
5.Deleting a layout:
You can delete a user-defined layout that you no longer require. To do this, select the layout, then press the [Del] key on your keyboard.
Predefined layouts can't be deleted.
Note: When you have once deleted a layout, you can't restore it. In the Manage Layouts dialog box, you can alternatively hide a layout that you don't need at the moment in the user interface. You can later display this layout again at any time.
4.Click the Move Up  button, located to the right of the list, and move your layout to the first position.
5.Click the Close button.
6.You will now find your layout in the list of layouts at the top position. Use, e.g., the View > Layout command to open a list containing all of the available layouts.
7.At the top right corner of the user interface, you will now find your own layout instead of the predefined layout.
00014 27092012