The Process menu offers you several functions for processing images, with them you can change an image's contrast or its colors.
Prerequisite: The Process menu only appears when an image is loaded in the document group and is active.
The process flow is the same for all image processing operations. The dialog box that is opened when you use an image processing operation is made up in the same way for every operation.
Description of dialog box
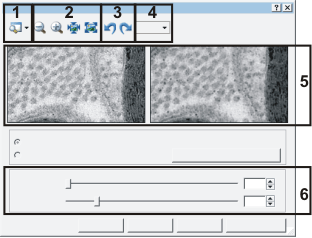
The image processing dialog box is divided into different areas. Click on one of the areas in the dialog box shown above jump to the corresponding help topic.
(1) Selecting preview functions
(2) Zoom functions for the preview images
(3) Reversing image processing operations
(4) Selecting another image processing operation
(5) Preview area with preview images
(6) Special settings for the selected image processing operation
See also
(1) Selecting preview functions
When you process an image you can choose between several different preview functions. To switch from one preview function to another, click the Preview  button each time you want to switch backwards or forwards. You can also select the preview function you want directly in the menu. You open this menu by clicking the small arrow next to the button.
Original and Preview
The Original and Preview preview function displays the same image segment twice, in the image processing dialog box's preview area. The one shown on the left is the source image. The one on the right is the image that results when the current parameters are used. Should the images not be displayed in the image processing dialog box in their entirety, the segment of the image that is on display will be identified by a white frame in the image window. The rest of the image will be shown shaded in the image window.
You can change the image segment.
To do this, click either in the image processing dialog box, or in the image window inside the white frame, and then move your mouse with the left button still depressed.
Alternatively, click once outside the white frame in the image window, to have the displayed image segment centered around the point you have selected.
Only Preview
The Only Preview preview function displays only the image segment with the resulting image, in the image processing dialog box.
Preview in Image
The Preview in Image preview function minimizes the size of the image processing dialog box. Then only the controls will be shown. The dialog box no longer contains a preview window. In the document group the resulting image of the selected image processing operation will be displayed, instead of the source image.
Please note that this preview function is not available for all image processing operations.
No Preview
The No Preview preview function minimizes the size of the image processing dialog box. Then only the controls will be shown. The preview area will be faded out of the dialog box. The source image will be displayed in the document group. With this preview function, you will no longer have a preview of the resulting image.
(2) Zoom functions for the preview images
Use the zoom functions to alter the display of the preview images in the image processing dialog box. These buttons are not active when no preview images are on display in the dialog box.
Use the zoom buttons 
 in the image processing dialog box to make the image segment on display in the preview larger or smaller.
Click the Actual Pixels  button to zoom the preview images to their original size (zoom factor 100%).
Click the Fit to Window  button to adapt the preview images' zoom factor to the current size of the image processing dialog box. The zoom factor will then be calculated to the maximum that will allow the preview images to be displayed in their entirety.
(3) Reversing image processing operations
Click the Undo  button to undo the results of the image processing operation you last carried out. Should you have carried out numerous image processing operations, every time you click this button, the previous function will be reversed. This means that you can at any time return to any point in your image processing operation and start from there once more, with other parameters or filters.
You can have the last operations that you reversed, performed once more. To do this, click the Redo  button.
When are the buttons available?
An image processing operation will not be carried out on the image until you have clicked the Apply button. The Undo and Redo buttons will only then become available.
If you don't click the Apply button, the selected image processing operation will only be applied to the image segment that is displayed in the preview area. The Undo and Redo buttons will be displayed in gray, because you can still change the parameters any way you want, without changing the image.
Reversing image processing operations after the dialog box has been closed
As soon as you click the OK button, you confirm the selected image processing operation, and close the image processing dialog box with its Undo and Redo buttons.
Please note that you can still use the Edit > Undo command, to undo all of the image processing operations that you have carried out. Operations can be undone as long as the image is loaded.
(4) Selecting another image processing operation
Every dialog box that is opened when you use an operation for processing images offers you access to all other operations for processing images. This enables you to test which function is the most appropriate for your task without any waste of time.
The following image processing operations are available: To help you keep track of everything, all functions are allotted to a group.
Selecting another image processing operation
Click the More button in the image processing dialog box, and select the image processing operation you want from the menu.
As soon as you select another image processing operation, the previously selected image processing operation will no longer have any effect on the source image. This means, for example, that you can try out several smoothing filters when you're not sure which one of them you want to use.
Carrying out several image processing operations one after the other
You can also carry out several image processing operations one after the other, without having to close the image processing dialog box between them. To do this, click the Apply button, before you select a further image processing operation.
For instance, it's often better to smooth an image, before you apply a sharpen filter. To do so, proceed as follows:
1.Load the image that you want to process.
2.Use e.g., the Process > Smoothing Filters > Lowpass... command to smooth the image.
3.Click the Apply button in the Filter - Lowpass dialog box.
4.The smoothing filter will then be applied to the image. When the Original and Preview preview function is active, a new source image will be displayed on the left-hand side. The new source image is the resulting image from the smoothing operation.
4.Click the More button in the Filter: Lowpass dialog box's toolbar.
5.From the menu, select the Sharpen Filters > Sharpen... command.
•The title of the image processing dialog box will change to Filter: Sharpen and by doing so, shows you which is the current image processing operation.
•When the Original and Preview preview function is active, the resulting image will be displayed on the right-hand side.
6.Set the strength of the sharpen filter with the Strength slide control.
7.Confirm the selected image processing operations with OK.
8.The Filter: Sharpen dialog box will be closed.
9.Please note that the image processing operation changes the source image. No new image document will be created.
10.The altered image will not be saved automatically. The fact that a change has to be saved will be indicated by an asterisk shown behind the image name in the document group.
(5) Preview area with preview images
By default, the preview area in the image processing dialog box is set up to show you two preview images. The preview image on the left is the source image, that on the right, the resulting image with the current parameters.
Changing the size of the preview area
You have numerous ways of adapting the image processing dialog box to suit your requirements. Should you, for example, need more room for the preview images, you can simply change the size of the dialog box. Or you can choose between various preview functions.
You can drag the image processing dialog box to any size you want. Doubleclick the dialog boxes header to enlarge the dialog box to full-screen size. Clicking the header again will return the dialog box to its original size.
Selecting an image segment
As a rule, only one segment of the source image can be displayed in the image processing dialog box. However, if you make sure that when you position this dialog box, you can always see the document group or the Image Navigator tool window, you will then have an overview of the entire image all of the time. In both the image window and the Image Navigator tool window, the image section on display will be indicated by a white frame. The areas of the image not on display will be shown shaded.
Use the zoom buttons in the image processing dialog box to make the image segment on display larger or smaller. You can also use your mouse directly in the image window to change the position and size of the image segment shown in the preview area.
Please note that you can also change the size of the image processing dialog box. The size of the preview area changes at the same time.
(6) Special settings for the selected image processing operation
Most of the image processing operations need one or two of the parameters that are shown in the Settings group. For example, you can adjust the effect of a smoothing or sharpen filter.
You will find a description of this parameter in the help topic on the corresponding image processing operation.
00174 05032013