It may well occur, that after the segmentation has taken place, objects in an image have not yet been correctly separated. To improve the segmentation, you can, for example, use a morphological filter.
See also
Carrying out an automatic image analysis
Separating touching objects
Task: Use the Separate Objects morphological filter to separate touching objects before performing an image analysis.
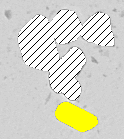
In this image, several objects are touching. This means that the detection process doesn't recognize them as separate objects. It counts them as a single object.
Preparation
1.Load the image that you want to analyze.
2.The Separate Objects filter creates separation lines on the image. This changes the image information. Therefore, save the source image under a different name if you want to keep the original data.
Separating objects
3.Use the Process > Morphological Filter > Separate Objects... command.
4.The Filter: Separate Objects dialog box opens.
4.Zoom into the source image to make it possible to easily recognize a typical object that has not been separated.
5.Select the Original and Preview preview function. Now, the same image segment will be displayed twice in the preview area of the image processing dialog box. The one shown on the left is the source image. The one on the right is the image that results when the current parameters are used.
6.Because the background is light in this example, select the Bright option in the Settings group.
7.Move the Fine / Coarse and Smoothness slide controls and observe the effect in the dialog box's preview. Start with the small values. Small values generally result in a lot of separation lines.
In this example, the objects are separated well using the Fine / Coarse = 1 and Smoothness = 3 parameters.
8.Select whether the filter is to take 4 or 8 neighboring pixels into account in each case, then observe the effect this has in the dialog box's preview. Select the parameter that does the best job of separating the touching objects.
9.In this example, select the Burn white option. The separation lines are now white and so don't interfere with the setting of the threshold values for the dark objects.
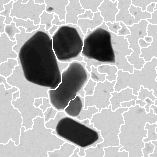
After the Separate Objects filter is applied white separation lines separate the touching objects.
10.In the Filter: Separate Objects dialog box, click the OK button to apply the filter.
•Note: The contents of the image will be changed. You may have to check the threshold value settings for the next object analysis.
•Depending on the size of the image, applying the Separate Objects filter can take a long time. Watch the progress bar located in the status bar.
•The object analysis that now follows will be performed on the changed segmentation image.
Carrying out an object analysis
11.In the Count and Measure tool window, click the Count and Measure button to perform the object analysis and output the results.
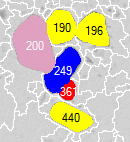
The image on the left shows the original image before the objects were separated. The image on the right shows the separated objects after the Separate Objects filter has been applied. The numbers are the objects' IDs. All objects with the same color belong to the same size class. Before the object was separated, it was so large that it couldn't be assigned to a size class. That's why it's cross hatched.
00514 04122014