Use the Magnification calibration process to acquire correctly calibrated images. Correctly calibrated images are a necessary precondition for being able to measure, for example, distances and areas on your images.
Calibrating the magnification using a Fourier transform
See also
Calibration process - Magnification
Calibrating the magnification
Prerequisites:
•Your system has already been configured and calibrated.
•You need a calibration standard to perform the calibration process. You can use the Carbon Black calibration standard or a cross grating standard, for example.
Setting up your microscope
1.Put your calibration standard into your microscope. For example, use a cross grating standard.

2.Make the necessary microscope settings. Choose a magnification and focus.
Preparing image acquisition
3.Switch your software to the Acquisition layout. To do so, select the View > Layout > Acquisition command.
•In this layout, all tool windows that you need for the image acquisition are automatically displayed.
4.In your software, make sure that the calibration standard is optimally displayed on the monitor.
•Switch to your camera's live mode. To do so, use the Acquire > Live command.
•Select the Automatic option in the Exposure group in the Camera Control tool window.
Performing the calibration process
5.Start the Magnification calibration process.
To do so, select the Magnification entry in the Acquire > Calibrations dialog box. Then click the Calibrate... button.
6.The Calibrate Magnification dialog box opens.
7.If you've already carried out the Magnification calibration process once, the Calibrated Magnifications group will already contain calibration data. If you want to carry out a whole new calibration, delete the existing calibration data. Otherwise, the new data will be added to the existing data.
8.The Preparation group describes the calibration process flow. In the list under step 1, you can find a list with all supported calibration standards.
6.Select your calibration standard from the list, located in the Preparation group. Use, for example, the Cross Grating Standard entry.
7.Select the Calibrate on live image check box.
8.Click the Set Calibration Distance... button.
•Your software will automatically switch to the live mode.
•All software functions for the image acquisition are now available.
9.Set the magnification at your transmission electron microscope. If your microscope can be controlled via remote by your software, you can also enter the magnification in the Microscope Control tool window. Start with a lower magnification, 3000 x for example.
10.If you are using the microscope without remote control, make sure that the magnification on the TEM and in the Microscope Control tool window are the same.
11.Check the image acquisition settings.
12.Bring the sample into focus.
Setting the calibration distance
13.Move the mouse pointer onto the image window. You can zoom into the image with your mouse. Use the sliders located at the right and bottom of the image window to select the image segment. Set the image display so that the start and end point of the calibration distance is displayed optimally on the monitor.
14.Left click on the start and end points of the calibration reference distance. When you use a cross grating standard, the calibration reference distance should include several squares of the grid. Count the squares.
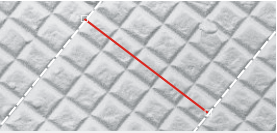
For the Magnification calibration process, use a cross grating standard, for example. One side of the cross grating standard shown is 463 nm. As reference length, 5 squares of the grid are used. The total reference distance is thus 5 x 463 nm = 2.315 µm.
15.Click the right mouse button and select the Confirm Input command in the context menu.
•The Set Reference Distance dialog box opens.
•When you use a cross grating standard, the width of one square of the grid (463 nm) is preset.
16.Enter the number of squares you used for the calibration.
17.Close the Set Reference Distance dialog box with OK.
•You will then return to the Calibrate Magnifications dialog box. In the diagram located at the top of the dialog box, the calibration (Pixel/nm) is plotted against the magnification. It contains the first point with the calibration data that was just defined.
•You can now repeat the calibration process for further magnifications.
Calibrating further magnifications
18.Click the Set Calibration Distance… button again.
19.Set the next magnification, in the Microscope Control tool window (10,000 x for example).
20.Refocus if necessary and define the calibration reference distance.
21.Calibrate at least one more magnification, 30,000 x for example, in this way.
Checking calibration data
22.You can check the calibration data directly in the Calibrate Magnifications dialog box. Take a look at the curve in the diagram at the top. The curve should be largely linear, almost a line, and it should go through the origin.
•If the curve contains outliers that aren't on the line, you have to repeat the calibration for the corresponding magnification.
•As soon as the calibration data for at least three magnifications is available, the Close button is replaced by the OK button.
23.Click the OK button to complete the calibration process.
•You will then return to the Calibration dialog box.
•The status of the Magnification calibration process is now Calibrated.
Calibrating the magnification using a Fourier transform
Note: Calibrate the magnification using a Fourier transform when you are working with very high magnifications.
You can use the Catalase calibration standard for a calibration using a Fourier transform.
Setting up your microscope
1.Put your calibration standard into your microscope. You can use the Catalase 8.75 calibration standard, for example.
Make the necessary microscope settings. Choose a high magnification and focus.
Preparing image acquisition
2.Switch your software to the Acquisition layout. To do so, select the View > Layout > Acquisition command.
•In this layout, all tool windows that you need for the image acquisition are automatically displayed.
3.In your software, make sure that the calibration standard is optimally displayed on the monitor.
•Switch to your camera's live mode. To do so, use the Acquire > Live command.
•Select the Automatic option in the Exposure group in the Camera Control tool window.
Performing the calibration process
4.Start the Magnification calibration process.
To do so, select the Magnification entry in the Acquire > Calibrations dialog box. Then click the Calibrate... button.
•The Calibrate Magnification dialog box opens.
•If you've already carried out the Magnification calibration process once, the Calibrated Magnifications group will already contain calibration data. If you want to carry out a whole new calibration, delete the existing calibration data. Otherwise, the new data will be added to the existing data.
5.Select the Calibrate on live image check box.
6.Select the Calibrate via Fourier Transform check box.
7.Click the Set Calibration Distance... button.
•Your software will automatically switch to the live mode.
•A ROI (region of interest) is displayed in the active image.
•In an additional image window, an FT image has been computed from the ROI. It displays an elliptical measurement object.
8.Set the magnification at your transmission electron microscope. If your microscope can be controlled via remote by your software, you can also enter the magnification in the Microscope Control tool window.
9.If you are using the microscope without remote control, make sure that the magnification on the TEM and in the Microscope Control tool window are the same.
10.Check the image acquisition settings.
11.Bring the sample into focus.
12.Define the ROI in the active image to specify the area to be used for the calibration using the Fourier transform.
•The FT image will be continually updated.
13.Select the measurement object in the FT image.
14.Use the handle on the measurement object to change its size.
15.Size the measurement object so that its edge is on a clearly visible spot that is close to the center.
16.When you have completed the definition of your reference length, click your right mouse button, then select the Confirm Input command in the context menu.
•The Set Reference Distance dialog box opens.
•Enter the order of the spots starting from the center in the Order field and confirm the reference length. For example, select "1" in the Order field when you've selected the spot that is closest to the center.
•When you are using the Catalase 6.85 calibration standard, the reference length is preset to 6.85nm.
17.Close the Set Reference Distance dialog box with OK.
18.You return to the Calibrate Magnifications dialog box. In the diagram located at the top of the dialog box, the calibration X (Pixel/nm) is plotted against the magnification. It now contains the spot with the calibration data that was just defined.
•Repeat the calibration process for at least 2 further magnifications.
Checking calibration data
19.Check the calibration data directly in the Calibrate Magnifications dialog box. Take a look at the curve in the diagram at the top. The curve should be largely linear.
20.If the curve contains outliers that aren't on the line, you have to repeat the calibration for the corresponding magnification.
21.As soon as the calibration data for at least three magnifications is available, the Close button is replaced by the OK button.
21.Click the OK button to complete the calibration process.
22.You will then return to the Calibration dialog box. The status of the Magnification calibration process is now Calibrated.
00289 04032015