The behavior of the live window depends on the acquisition settings in the Acquisition Settings > Acquisition > General dialog box.
Prerequisite
As prerequisite for the following step-by-step instructions, the following settings have been made in the Acquisition Settings > Acquisition > General dialog box. The Keep document when live is stopped option is selected and the Create new document when live is started check box is cleared.
Switching the live-image on and off without acquiring an image
Switching to the live-image and acquiring an image
Displaying the live-image and the acquired images simultaneously
See also
Acquisition Settings - Acquisition - General
 Switching the live-image on and off without acquiring an image
1.Make the Camera Control tool window appear. To do this, use, e.g., the View > Tool Windows > Camera Control command.
2.Click the Live button in the Camera Control tool window.
3.A temporary live window named Live (active) will be created in the document group.
4.The live-image will be shown in the live window.
5.You can always recognize the live modus by the changed look of the Live  button in the Camera Control tool window.
3.Click the Live button again.
4.The live mode will be switched off.
5.The active live image will be stopped.
6.The live window's header will change to Live (stopped). You can save the stopped live-image located in the live window just as you can every other image.
Note: The live window may look similar to an image window, but it will be handled differently. The next time you switch on the live mode, the image will be overwritten. Additionally, it will be closed without a warning message when your software is closed.
 Switching to the live-image and acquiring an image
1.Make the Camera Control tool window appear. To do this, use, e.g., the View > Tool Windows > Camera Control command.
2.Click the Live button in the Camera Control tool window.
3.A temporary live window named Live (active) will be created in the document group.
4.The live-image will be shown in the live window.
5.You can always recognize the live modus by the changed look of the Live button in the Camera Control tool window.
3.Click the Snap button.
4.The live mode will be switched off. The live window's header will change to Live (stopped).
5.At the same time, a new image document will be created and displayed in the document group. You can rename and save this image. If you have not already saved it when you end your software, you will be asked if you want to do so.
Displaying the live-image and the acquired images simultaneously
Task
You want to view the live-image and the acquired images simultaneously. When you do this, it should also be possible to look through the acquired images without having to end the live mode.
1.Close all open documents.
2.Open the Acquisition Settings > Acquisition > General dialog box.
To do so, click, e.g., the Acquisition Settings  button on the Camera Control tool window.
3.There, make the following settings:
4.Choose the Keep document when live is stopped option.
5.Clear the Create new document when live is started check box.
6.Select the Continue live after acquisition check box.
4.Switch to the live mode. Acquire an image, then switch the live mode off again
5.Both of the image windows Live (stopped) and Image_<Serial No.> are now in the document group.
6.The Live (stopped) image window is active. That's to say, right now you see the stopped live-image in the document group. In the document bar, the name Live (stopped) is highlighted in color.
5.Split the document group, to have two images displayed next to each other.
That's only possible when at least two images have been loaded. That's why you created two images in the first step.
6.Use the Window > Split/Unsplit > Split/Unsplit Document Group (Left) command.
7.This command creates a new document group to the left of the current document group. In the newly set up document group the active document will be automatically displayed. Since in this case, the active document is the stopped live-image, you will now see the live window on the left and the acquired image on the right.
7.Start the live mode.
8.In the document group, the left window will become the live window Live (active). Here, you see the live-image.
8.Activate the document group on the right. To do so, click, for example, the image displayed there.
9.Click the Snap button.
10.The acquired image will be displayed in the active document group. In this case, it's the document group on the right.
11.After the image acquisition has been made, the live-image will automatically start once more, so that you'll then see the live-image again on the left.
12.While the live-image is being shown on the left, you can switch as often as you want between the images that have up till then been acquired.
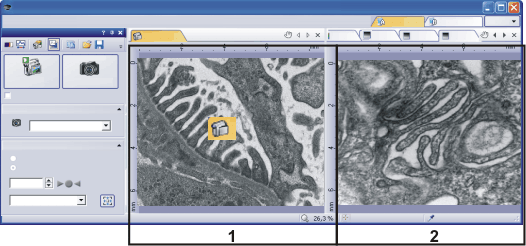
You can set up your software's user interface in such a way that you can view the live-image (1) and the images that have up till then been acquired (2), next to one another.
00181 16042013