Your software gives you the option of importing image formats that weren't created by your software. This can be a standard format, TIF format for example, that contains multi-dimensional pages that aren't recognized by your software. When you open an unknown image format with your software and the Open Multi Page Image File dialog box appears, you can make various settings to convert the image into your software correctly. You can enter the know dimensions of your source image in the Open Multi Page Image File dialog box. Your software uses this information to convert a new multi-dimensional image.
Note: The source image is not changed by the conversion. You can save the converted file under a new name with the File > Save As... command.
See also
Options - Image Import Filter - Open Multi Page Image File
Opening the dialog box
The Open Multi Page Image File dialog box appears automatically when you open a multi-dimensional image and the format isn't recognized by your software.
The dialog box's structure
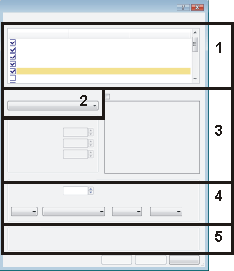
The dialog box is divided into different areas. Click on one of the areas in the dialog box shown above to jump to the corresponding help topic.
(1) Overview of the pages in the source file
(2) Page selection
(3) Range of pages
(4) Select dimension axes of target image
(5) Information
(1) Overview of the pages in the source file
This dialog box contains an overview of all of the individual pages that are contained in the source image. The overview contains the name of every single page, its size and the pixel format.
(2) Page selection
Use the Page selection picklist to select the selection mode that you want to use for the import of the pages.
Use the Single Page entry when you only want to import a single page. Click the page in the overview to select it. The selected page will be indicated by a check  .
.
Use the All Pages entry when you want to select and import all of the pages.
Use the Selection in list entry when you want to select individual pages. You can add or remove individual pages from the selection. Click the corresponding check box next to the file name to select a page. You can remove the page from the selection by clicking the check mark next to the file name. The page will be selected or removed from the selection.
Keep the [Shift] key pressed after you have selected a page. If you now click on another check box, the range between them will be selected.
Use the Range of Pages entry to define an range of several pages to be converted.
(3) Range of pages
The Range of pages group is only active when you have selected the Range of Pages option in the Page selection picklist.
In the First page field, you enter the number of the first page to be selected.
In the Step width field, you specify in what increments the pages are selected. For example, with a step width of 4 only every 4th page is selected.
In the Last page field, you enter the number of the last page to be selected.
Select the Preview check box. You get a preview of the selected page.
You can find more information on changing the maximum possible page size for the preview here.
(4) Select dimension axes of target image
In the Select dimension axes of target image group, you can select the dimension axes from the source image, which of course you already know, that you want to convert into the target image.
In the Count field, enter the number of dimensions. At least two dimensions have to be entered, one dimension for the X-axis and one dimension for the Y-axis.
The Axis picklist contains the number of dimensions that you set in the Count field.
In the Meaning picklist, you can assign a definition for the dimensions. The following definitions are available: X, Y, Z, Channel, Time, Wavelength, and Undefined. You can't assign a definition to dimensions 1 and 2. By default, the definition for axis 1 is set to X (for the X-axis) and the definition for axis 2 is set to Y (for the Y-axis). If a value has already been used, it is no longer available for selection.
In the Size picklist, the width and height of the page are automatically assigned to dimensions 1 and 2. If you have set other dimensions, select a value for them.
In the Source Axis picklist, you can change the order of the dimensions if you want them to be different in the source image and the target image. Specify the order for the dimensions in the target image.
Example: You have a source file composed of the dimensions X, Y, Z and time. You enter the number of dimensions in the Count field. You therefore have four dimensions to select from in the Axis picklist. In the Axis picklist, select the value 1 for the first dimension. In the Meaning picklist, dimension X is available to be selected. In the Size picklist, the size of the X axis is available to be selected. In the Source Axis picklist, change the order if necessary.
Do the same for the other three dimensions, assigning them values from the picklists.
(5) Information
The Information group tells you whether the selected pages are valid and compatible. If The selected pages are valid and compatible. is displayed, click the OK button to start the conversion.
1007 31012014