Use the Image > Geometry > Resize command, to make the active image larger or smaller.
The dialog box that is opened when you use a geometry function is made up in the same way for every operation. Click here to switch to a description of this dialog box.
Characteristics of the resulting image
•The Image > Geometry > Resize... command changes the actual number of pixels. In contrast to this, the zoom commands that you find on the Zoom toolbar, for example, only change the appearance of the image on the monitor.
•The image calibration and the image type will be retained.
Settings for the geometry function
Width / Height
Set what size you want the resulting image to be. You can enter either a zoom factor or the desired height and width of the resulting image. You can enter the height and width either in the unit pixel or in absolute units of length.
If you enter a zoom factor of more than 100% you will make the image larger. A zoom factor of less than 100% will reduce its size.
When you reduce size, image information will be lost, since the resulting image will contain fewer pixels than the source image. For example, at a zoom factor of 50 %, every second pixel will be left out.
When you enlarge an image, pixels in the gray/color value of the original pixels will be added. For example, when you use a zoom factor of 200%, one pixel in the source image, will appear as four pixels of the same gray/color value in the resulting image. With zoom factors that are not even, e.g., 150%, only a portion of the pixels can be doubled in number. As a result, it can happen that e.g., bars of the same size in the source image will appear with different widths in the resulting image. You can compensate for this to a large extent by using interpolation when you zoom.
Interpolation
When you zoom out an image, it is inevitable that several pixels, that can all have different gray/color values, will be combined into one single pixel. Your software has to decide which gray/color value this pixel is to have.
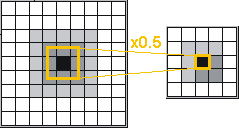
In the example shown above, the image on the left has been zoomed out by a factor of 0.5. To achieve this, all of the pixels in the image segment that is shown in yellow, had to be combined into one pixel. Depending on the interpolation method chosen, the resulting image's gray/color values will be differently calculated.
Select the None option in the Interpolation list, if you don't want the image to be interpolated when you zoom it. The pixel in the resulting image will then keep the gray/color value of the appropriate pixel in the source image. In the example shown, the pixel remains black.
However, without the use of interpolation, the resulting image can show intensity gaps.
Use the Bilinear option to average out the gray/color values of adjoining pixels in the source image. When you employ bilinear interpolation, the gray values, or the color value transition in the resulting image will appear more continuous. However, employing this process can create the impression that the image is too soft, or is washed-out.
Use the Bicubic option to average out the gray/color values of adjoining pixels in the source image. In this process, considerably more pixels will be taken into consideration than in the bilinear interpolation. Bicubic interpolation produces a resulting image that looks sharper and better than when bilinear interpolation is used. However, the calculation takes longer, and where there are sharp contrast transitions overshooting can occur.
Select the Supersampling option when you reduce the resulting image radically in size. This interpolation method produces far and away the best looking resulting images. However, it also takes the most calculation time.
Keep ratio
The Keep ratio check box indicates whether or not the source image's X/Y-ratio is to be retained. When this check box is activated the Width and Height fields will be coupled with each other.
Note: This check box is selected by default to prevent images from becoming distorted when their size is altered.
1716 02042013