Use the Camera Length calibration process to acquire acquired images in Diffraction mode correctly. Correctly calibrated images are a necessary precondition for being able to measure, for example, distances and angles on your images.
Starting the software wizard
Prerequisite: The microscope is in Diffraction mode.
To start the software wizard for this calibration process, select the Camera Length calibration process in the Acquire > Calibrations dialog box. Then click the Calibrate... button.
Description of dialog box
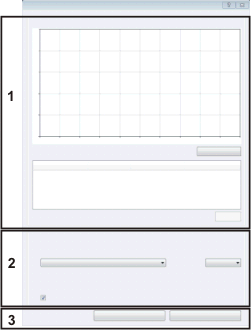
The Calibrate Camera Lengths dialog box is divided into different areas. Click on one of the areas in the dialog box shown schematically above to jump to the corresponding help topic.
(1) Chart and table showing the current calibration data
(2) Preparing the calibration process
(3) Setting the calibration distance
See also
(1) Chart and table showing the current calibration data
Check the current calibration data in the Calibrated camera lengths group.
In the table, you can find all the camera lengths for which the calibration process has already been carried out. The camera length and the resulting X and Y resolution is specified in units of [1/(nm*pixel)].
The chart shows the pixel size, which is measured in a reciprocal unit of length.
Inverting the X-axis
Click the Invert X-Axis button to toggle between the Camera Length [mm] and the Inverted Camera Length [1/mm] display. With a correct calibration, the points should all be roughly on one line.
Deleting calibration data
Select the entry in the table containing invalid calibration data, and click the Delete button.
When you carry out a calibration process for a camera length hat already has calibration data, the new calibration data replaces the existing calibration data.
How many camera lengths have to be calibrated?
Repeat the calibration process for at least three different camera lengths.
You don't have to carry out the calibration process for all of your microscope's camera lengths. When you set a camera length that's not in the list, the calibration data is extrapolated from the available calibration data.
(2) Preparing the calibration process
In the Procedure group, you prepare the calibration process.
Selecting the calibration standard
You need a calibration standard to perform the calibration process. You can use the Aluminium (polycrystal) calibration standard, for example.
1.Select the calibration standard that you are using from the list.
2.In the Miller Indices list, select the corresponding Miller Indices.
Adding a calibration standard
When you are using a calibration standard that isn't on the list yet, you can define an additional entry for the list.
1.In the Procedure group, select the Edit Calibration Standard... entry from the list.
2.The Edit Calibration Standard dialog box opens.
2.In the Edit Calibration Standard dialog box, click the Add... button.
•Another Add Calibration Standard dialog box opens.
3.Enter the name of your calibration standard in the Name field.
4.From the Measurement list, select the Circle entry or the Line entry.
5.In the h, k and l columns, enter the Miller Indices. In the d-Spacing column, enter the corresponding d-value.
6.Select the unit, in the Unit column.
7.Double click this button  if you want to add a second row with Miller Indices to the calibration standard.
8.Close the two Edit Calibration Standard dialog boxes with OK.
•The new calibration standard will then be displayed in the list.
Editing calibration standards
You can delete self-defined calibration standards from the list or change the list of Miller Indices at any time.
1.In the Procedure group, select the Edit Calibration Standard... entry from the list.
2.Click the Edit... button.
3.In the Edit Calibration Standard dialog box, select the calibration standard you want to edit or delete.
4.Edit the values or click this button  to delete the calibration standard.
•The calibration standards that are predefined in the software can't be deleted or edited.
5.Close the two Edit Calibration Standard dialog boxes with OK.
(3) Setting the calibration distance
Calibrating on live image
Select the Calibrate on live image check box. Now, you can carry out the whole calibration process in the live mode.
If you can't obtain a good view of the reference length in the live-image, clear the Calibrate on live image check box. Now you can focus the diffraction image, select the exposure time and the camera length in the live mode. Then click the OK button in the Calibration Note message box to acquire the image to be used for the definition of the reference length.
Snapping to brightest pixel
Select the Use Snap to brightest pixel function check box. If you only insert one reference point for the measurement of the calibration reference distance, the calibration reference distance's reference point automatically snaps to a diffraction spot near the position that was clicked. You can move the calibration reference distance later by clicking the selection markers and dragging them to a new position.
Click the Set Calibration Distance... button to start the calibration process. You can find a step-by-step instruction here.
Click the Finish button to complete the calibration process. For this to work, you have to have carried out the calibration process for at least three different camera lengths.
If fewer calibration data are available, you are able to leave the Calibrate Camera Lengths dialog box, but the calibration process remains incomplete. Then the dialog box will contain only the Finish button and not the OK button. The acquired calibration data remain unchanged.
2155 24022015